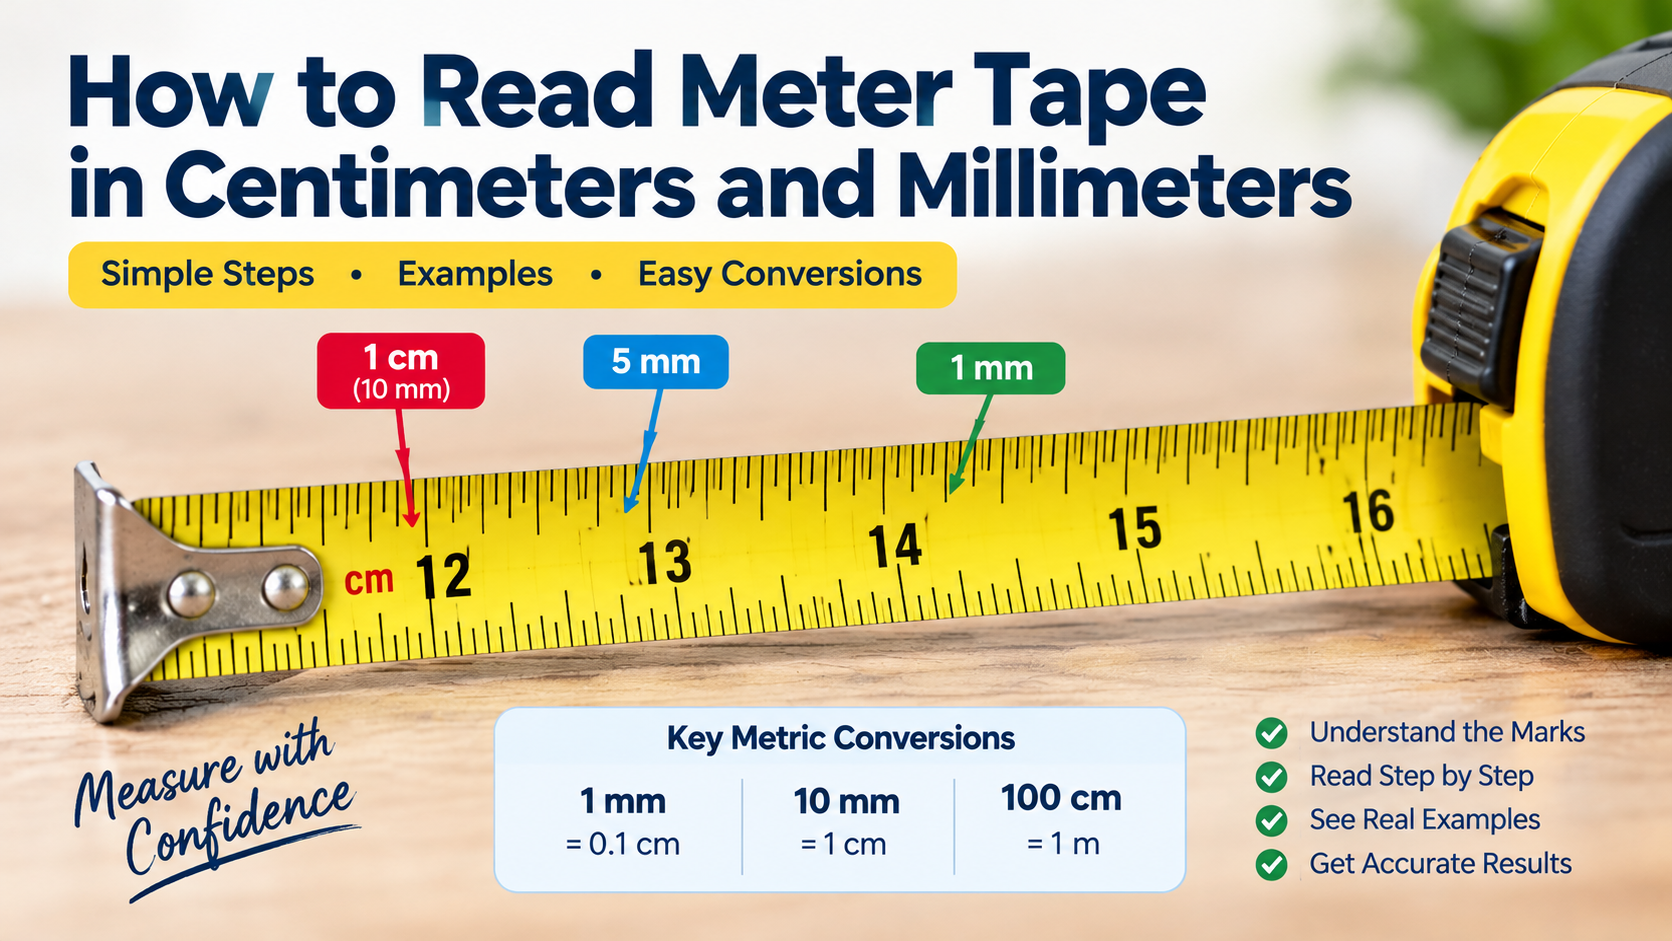
To read a meter tape, find the last full centimeter mark, count the extra millimeter lines, and add them together. Every 10 millimeters (mm) equals 1 centimeter (cm), and 100 centimeters equal 1 meter (m). For example, if an object ends 7 small lines after the 12 cm mark, its length is 12 cm 7 mm, or 12.7 cm.
Learning how to read meter tape markings is simple once you know which lines represent centimeters and millimeters. However, the method can look different on metric-only tapes, dual metric-imperial tapes, and flexible measuring tapes. This guide explains each type, with step-by-step examples, conversion tables, and tips for getting reliable measurements.
What the Marks on a Meter Tape Mean
A meter tape is a flexible measuring tool used to measure length, width, height, and distance. On a standard metric tape, the numbered marks usually show centimeters, while the smaller lines between them show millimeters.
The metric system works in groups of ten, making measurements easy to read and convert.
Here are the basic relationships:
Understanding the different line lengths
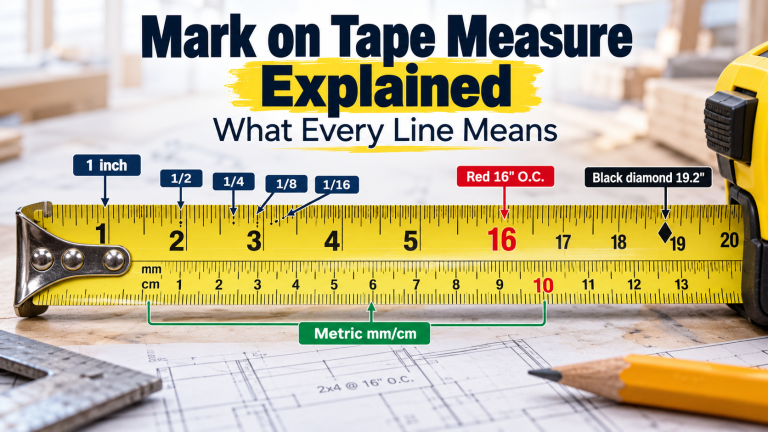
Most metric tape measures use different line lengths to make the scale easier to read.
| Mark on the tape | Meaning | How to identify it |
| Small line | 1 mm | Short divisions between centimeter marks |
| Middle line | 5 mm | Often longer than the other millimeter lines |
| Centimeter line | 10 mm or 1 cm | Usually longer, often beside a number |
| Meter mark | 100 cm or 1 m | May be highlighted or marked with a meter symbol |
For example, look at the space between 4 cm and 5 cm. That space contains ten equal millimeter intervals.
The middle mark represents 4.5 cm, while the final centimeter mark represents 5 cm.
Note: Not every tape uses the same colors, numbering, or line lengths. Some display millimeter numbers instead of centimeter numbers. Always check the unit labels and spacing before measuring.
How to Read Meter Tape in Centimeters and Millimeters
The easiest way to read a metric tape measure is to identify the last complete centimeter, count the remaining millimeters, and combine the values.
Follow these steps for most household and workshop measurements.
Step 1: Find the zero mark
Place the zero point of the tape at the starting edge of the object.
If you use a retractable metal tape, position the end hook against the edge. If you use a flexible sewing tape, align the printed zero line with the starting point.
Do not assume that the physical end of every flexible tape is exactly zero.
Step 2: Find the last whole centimeter
Look at the point where your object ends.
Find the numbered centimeter mark immediately before that point.
For example, if the object ends between 15 cm and 16 cm, your whole-centimeter reading is 15 cm.
Step 3: Count the extra millimeter marks
Count the small 1 mm intervals after the last whole centimeter.
Suppose the end of the object falls four small divisions after 15 cm.
The extra distance is 4 mm.
Step 4: Combine centimeters and millimeters
Add the whole centimeters and remaining millimeters.
15 cm + 4 mm = 15 cm 4 mm = 15.4 cm
You can also write the same length as 154 mm.
The basic formula is:
Total millimeters = (centimeters × 10) + extra millimeters
To convert millimeters into centimeters, divide by 10.
Step 5: Record the result with the correct unit
Write your measurement clearly so someone else can understand it.
For example:
All three values represent the same length.
Avoid writing only “15.4” without a unit.
How to Use Meter Tape: Three Worked Examples
Once you understand the marks, you can measure objects without converting every line separately.
These examples show how to read short and longer measurements, including distances that pass the 1-meter mark.
Example 1: Measuring a small object in centimeters
Suppose you are measuring the width of a notebook.
- Place the tape’s zero point against the notebook’s left edge.
- Find the last whole centimeter before the right edge: 18 cm.
- Count six more millimeter intervals.
- Add the values: 18 cm + 6 mm.
Answer: 18.6 cm = 186 mm
The six millimeters become 0.6 cm because each millimeter equals one-tenth of a centimeter.
Example 2: Reading a measurement beyond one meter
Suppose you are measuring a tabletop.
- Start from zero and extend the tape across the table.
- Read the endpoint as 1 m, 24 cm, and 7 mm.
- Convert 1 meter into 100 centimeters.
- Add: 100 cm + 24 cm + 0.7 cm.
Answer: 124.7 cm = 1,247 mm = 1.247 m
You do not need to restart counting after the 1-meter mark.
Example 3: Reading a measurement with a decimal
Suppose a shelf measures 63 cm and 5 mm.
- Read the main centimeter value: 63 cm.
- Read the extra millimeters: 5 mm.
- Convert 5 mm into 0.5 cm.
- Add: 63 + 0.5.
Answer: 63.5 cm = 635 mm
This is also 0.635 m.
Quick metric reading practice
Use this table to check how centimeters and millimeters are written together.
| Tape reading | In millimeters | In centimeters |
| 6 cm 3 mm | 63 mm | 6.3 cm |
| 12 cm 8 mm | 128 mm | 12.8 cm |
| 25 cm 5 mm | 255 mm | 25.5 cm |
| 47 cm 9 mm | 479 mm | 47.9 cm |
| 1 m 14 cm 5 mm | 1,145 mm | 114.5 cm |
Remember that 5 mm is 0.5 cm, not 0.05 cm.
Reading a Metric and Imperial Tape Measure
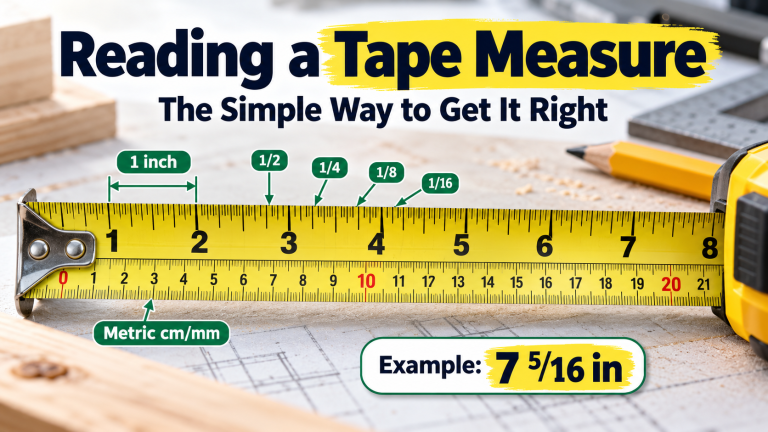
A metric and imperial tape measure shows two measurement systems on the same blade. One scale displays centimeters and millimeters, while the other displays inches and their fractions.
You can use either scale, but you must read the correct side and avoid mixing units.
How to recognize the two scales
On many dual-scale measuring tapes:
Look for labels such as cm, mm, or in to confirm the scale.
How to read the metric side
If an object ends at 20 cm and 3 mm, record 20.3 cm.
Do not use the inch marks on the other side to count the remaining millimeters.
How to read the imperial side
If a project requires inches, read the inch scale rather than the centimeter scale.
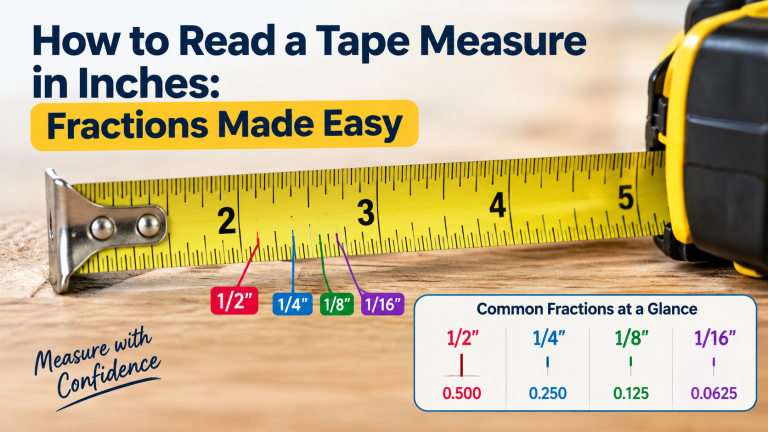
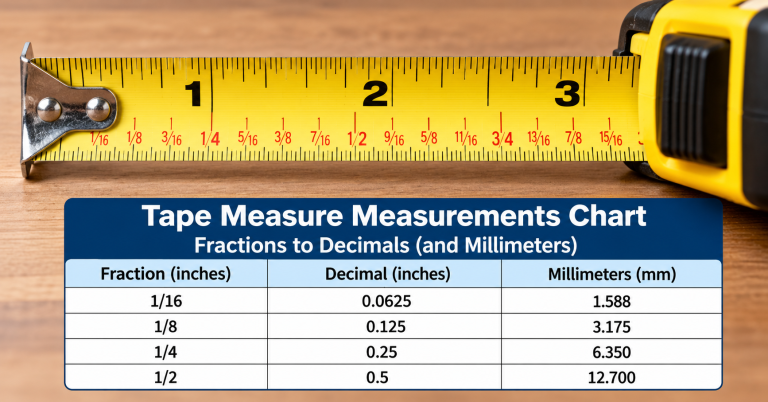
On a dual-scale measuring tape, the imperial side usually displays inches divided into fractions such as 1/2, 1/4, 1/8, and 1/16. These divisions work differently from the decimal-based metric system, so counting the smaller lines requires a slightly different approach.
For a more detailed explanation of fractional measurements, follow our guide to reading an imperial tape measure.
Metric to imperial conversion chart
The internationally defined inch equals exactly 25.4 mm. The following values use that conversion; non-exact inch values are rounded.
| Metric length | Millimeters | Inches |
| 1 mm | 1 mm | 0.0394 in |
| 1 cm | 10 mm | 0.3937 in |
| 2.54 cm | 25.4 mm | 1 in |
| 10 cm | 100 mm | 3.9370 in |
| 50 cm | 500 mm | 19.6850 in |
| 1 m | 1,000 mm | 39.3701 in |
For example, if a table measures 50 cm:
50 ÷ 2.54 = 19.685 inches (approximately)
You can use a metric imperial tape measure to compare the scales directly, but mathematical conversion is useful when you need a decimal-inch value.
Converting between metric and imperial measurements becomes more complicated when inch fractions are involved. For example, a measurement written as 5/16 inch may need to be expressed in decimal inches or millimeters for comparison with a metric measurement.
Our fractional-inch conversion reference provides commonly used equivalents and helps you check conversions without repeatedly performing the calculations yourself.
How to Measure Objects Correctly With a Meter Tape
Knowing how to use meter tape markings is only one part of taking an accurate measurement. The position of the tape, starting point, and shape of the object also matter.
Correctly reading centimeter and millimeter markings is important, but the position of the measuring tape also affects the result. Keeping the blade straight, using the starting point correctly, and reading the scale directly can help reduce common measurement errors.
If you need a broader explanation of these practical steps, our guide to general tape measuring techniques covers the fundamentals for both metric and imperial tapes.
The following methods cover common household situations.
Measuring a straight object
Lay the tape flat along the object’s length.
Start at zero, keep the blade straight, and read the mark directly above the endpoint.
Avoid holding the tape diagonally because a diagonal path can give a longer measurement than the straight distance you need.
Measuring furniture and inside spaces
For a table or shelf, measure between the two intended edges.
For the inside width of a cupboard, you may find it difficult to position the hook directly inside a corner.
One useful method is the offset method:
- Position the 10 cm mark at the first inside edge.
- Extend the tape to the opposite edge.
- Suppose the far edge reads 42.8 cm.
- Subtract the starting offset: 42.8 − 10 = 32.8 cm.
Answer: The inside width is 32.8 cm.
This avoids bending a metal tape sharply into a corner.
Measuring round or curved objects
If you need the distance around an object, use a flexible measuring tape.
Wrap it smoothly around the surface without twisting it. Keep it snug, but do not stretch the tape or compress a soft object.
Remember that the distance around a circular object, called its circumference, is different from its width across the center, called its diameter.
Measuring longer distances
For longer objects, keep the tape as straight and supported as possible.
Use a helper when needed to hold the starting point. Avoid letting the blade sag or bend.
If the measurement must fit a tight space, check the distance more than once before cutting or installing anything.
Why Real Meter Tape Measurements Can Differ
Two measurements of the same object may not match exactly, even when you read the marks correctly.
Small differences can come from the tape’s condition, your viewing angle, temperature, or the way you position the tool.
1. Worn or damaged starting edge
A bent hook or damaged zero mark may shift the starting position.
Check the first few centimeters for damage. If the start is unreliable, measure from a known mark such as 10 cm and subtract that offset.
2. Movement of the end hook
Many retractable metal tapes have a slightly moving hook. This is intentional on tapes with a true-zero design.
The hook moves to compensate for its thickness when measuring by pulling against an edge or pushing against a surface.
Do not tighten it just because it moves slightly. However, a bent, damaged, or excessively loose hook may affect readings. Stanley explains this feature in its PowerLock tape documentation.
3. Parallax error
Parallax happens when a mark appears to change position because you view it from an angle.
Place your eyes directly above the measurement mark rather than looking from the side.
4. Tape wear or stretching
A worn metal blade may develop bends or kinks. A soft measuring tape can stretch over time.
These changes may produce different results, especially when measuring longer lengths.
5. Temperature and tape tension
Metal expands or contracts as its temperature changes. This effect is usually small for short household measurements at normal room temperatures but can matter in precision work or over long distances.
Pulling a flexible tape too tightly can also change the reading.
How to check your meter tape at home
You can make a basic comparison without special equipment.
- Find an undamaged ruler with clear millimeter markings.
- Align the tape’s zero point with the ruler’s zero.
- Compare the 100 mm (10 cm) mark on both tools.
- If possible, also compare a longer section with a reliable reference.
- Repeat the check using the tape’s hook, both pulling and pushing, if it has a true-zero design.
If the readings differ, inspect the tape and reference ruler before deciding which is wrong.
Important: Small printed divisions do not guarantee that a tape is accurate to 1 mm. If the measurement needs a strict tolerance, check the manufacturer’s accuracy specification or use an appropriately calibrated tool.
Common Mistakes When Reading a Meter Tape
Most reading errors happen when people mix up the scale, count the wrong marks, or start from the wrong position.
These seven mistakes are worth checking before you record a measurement.
- Confusing centimeters with millimeters. Remember that 10 mm equals 1 cm. A measurement of 25 mm is 2.5 cm, not 25 cm.
- Mistaking a 5 mm mark for a full centimeter. The middle line between two centimeter marks often indicates half a centimeter.
- Reading the wrong scale. On a dual-scale tape, confirm whether you are reading centimeters or inches before recording the value.
- Starting from the wrong point. An incorrectly placed zero mark creates an error in the entire measurement.
- Measuring at an angle. Keep the tape aligned with the actual distance you want, not across a diagonal.
- Writing decimal values incorrectly. For example, 8 cm 7 mm equals 8.7 cm, not 8.07 cm.
- Assuming every tape has identical markings. Some tapes number centimeters, others emphasize millimeters or meters. Check the unit labels and the spacing between marks.
A useful habit is to say the measurement aloud in full units before writing it down.
For example: “Twenty-three centimeters and four millimeters” becomes 23.4 cm.
Frequently Asked Questions
These quick answers cover the meter tape questions that beginners ask most often.
1. How do you read millimeters on a meter tape?
Find the last whole centimeter mark and count the small millimeter intervals after it. Each interval usually represents 1 mm on a standard metric tape. For example, three intervals after 8 cm gives 8.3 cm or 83 mm.
2. How many millimeters are in one centimeter on a tape measure?
There are exactly 10 millimeters in 1 centimeter. That means each millimeter represents 0.1 cm.
3. What does 5 mm look like on a measuring tape?
Five millimeters is halfway between two consecutive centimeter marks. On many metric tapes, this midpoint is shown with a slightly longer line.
4. Can I use a metric and imperial tape measure at the same time?
Yes. A dual-scale tape lets you read metric measurements and inches from the same tool. Use the correct scale for each reading, and remember that 1 inch equals exactly 2.54 cm.
5. Why does my tape measure hook move?
On many retractable tapes, the end hook moves slightly by design. This helps compensate for the hook’s thickness when you measure by pulling or pushing against an edge. Excessive looseness or damage should be checked.
Final Thoughts
Learning how to read meter tape markings becomes easier when you remember the basic rule: 10 millimeters make 1 centimeter, and 100 centimeters make 1 meter. Find the whole centimeter, count the remaining millimeters, and write the result with its unit.
For everyday measuring, careful alignment and a clear reading matter more than complicated calculations. With a little practice, you can read metric-only and dual-scale tapes confidently while recognizing when a measurement needs a more precise tool.