
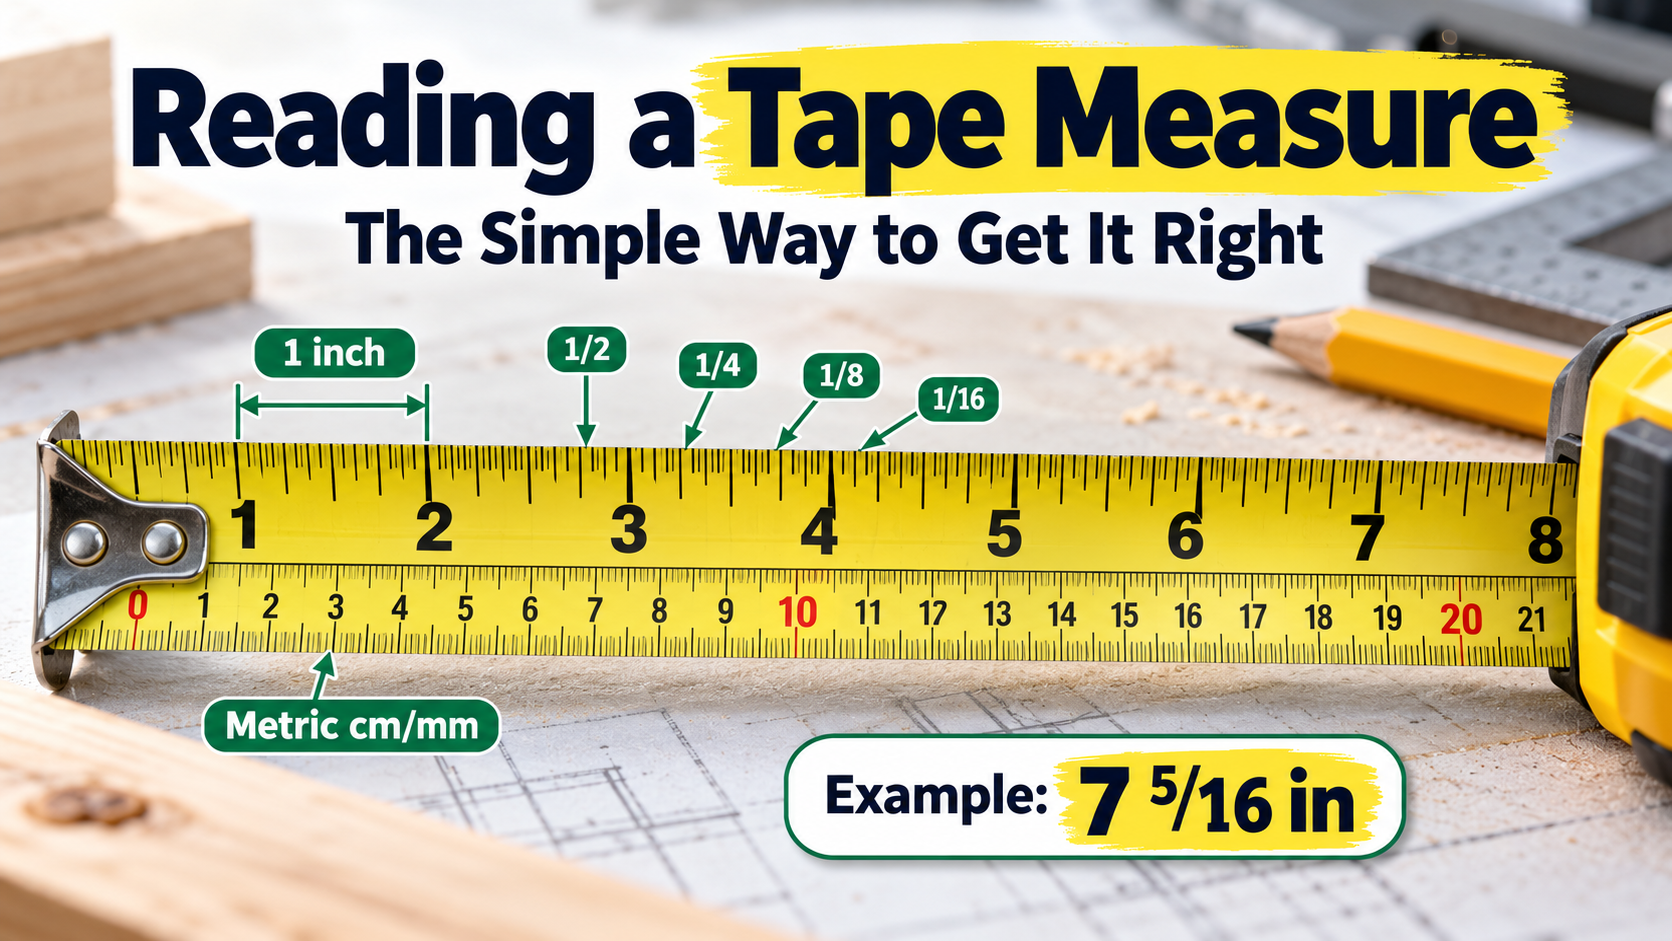
Reading a tape measure is simple once you understand the numbers and the small lines between them. On a common inch tape, each inch is divided into 16 equal parts, so the smallest marked step is usually 1/16 inch (about 1.59 mm). On a metric tape, each centimeter contains 10 millimeters (mm). To get a measurement, read the last whole number and add the smaller divisions.
The method depends on whether your tape uses inches, centimeters, or both. Some tapes also have finer markings. This guide explains how to read each scale, work out fractions, measure objects correctly, and avoid mistakes that can change your results.
Reading a Tape Measure: Start With These Three Steps
To read a tape measure, find the last whole unit before the point you are measuring. Then count the smaller divisions between that number and the endpoint. Add those divisions to the whole number to get the complete length.
Here is the basic method for both beginners and regular DIY users.
- Find the starting point. Place the metal end hook against the edge of the object. The measurement begins at zero, even if a zero is not printed on the tape.
- Identify the last whole number. Look at the numbered mark immediately before the object’s endpoint. This is the full number of inches or centimeters.
- Read the smaller lines. Count the remaining fractions of an inch or millimeters until you reach the endpoint.
For example, suppose an object ends halfway between 5 and 6 inches. Your measurement is 5 1/2 inches, not 6 inches.
On a metric tape, if the endpoint is 4 small divisions beyond 12 cm, the reading is 12 cm and 4 mm, or 12.4 cm.
Quick rule: Whole number + smaller division = final measurement.
Always read the line where the object ends, rather than the center of the printed number.
How to Read the Lines on a Tape Measure in Inches
An inch tape uses fractions instead of decimal numbers for its smaller marks. The longest lines usually show whole inches, while shorter lines divide each inch into smaller parts.
The imperial side of a tape measure uses differently sized lines to divide each inch into smaller measurements. While the longer lines are relatively easy to recognize, the shorter eighth-inch and sixteenth-inch markings often require more practice.
If you want to understand how to identify and read inch fractions, the dedicated tutorial explains each division with practical examples.
What each line means
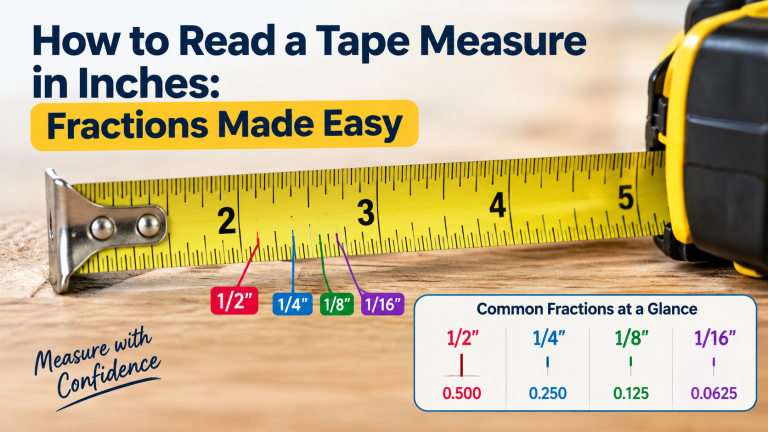
On a common 1/16-inch tape, the line lengths follow a pattern. The largest fraction has the longest intermediate mark, and the smaller fractions have shorter marks.
| Line or mark | Measurement | How to recognize it |
| Whole inch | 1 inch | Longest line, usually numbered |
| Half inch | 1/2 inch | Long line halfway between inch numbers |
| Quarter inch | 1/4 inch | Lines at one-quarter and three-quarters |
| Eighth inch | 1/8 inch | Shorter lines between quarter-inch marks |
| Sixteenth inch | 1/16 inch | Usually the shortest lines on the inch scale |
These values follow the conventional U.S. customary inch scale. Some manufacturers use different line lengths, print fractions directly, or provide smaller 1/32-inch divisions.
A useful way to understand the pattern is to imagine dividing an inch in half repeatedly:
Each new division gives a smaller measurement.
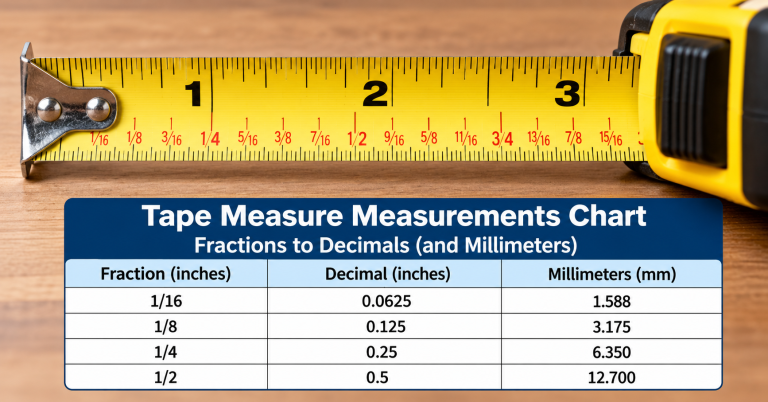
The complete 1/16-inch reading chart
When an inch is divided into 16 equal spaces, there are 15 intermediate tick marks between the two whole-inch lines. Counting those spaces from the previous whole inch gives the fraction.
This reference chart uses the standard U.S. customary inch subdivisions, with fractions reduced to their simplest forms. The decimal values are exact.
| Number of 1/16-inch spaces | Fraction of an inch | Decimal inches |
| 1 | 1/16 | 0.0625 |
| 2 | 1/8 | 0.125 |
| 3 | 3/16 | 0.1875 |
| 4 | 1/4 | 0.25 |
| 5 | 5/16 | 0.3125 |
| 6 | 3/8 | 0.375 |
| 7 | 7/16 | 0.4375 |
| 8 | 1/2 | 0.5 |
| 9 | 9/16 | 0.5625 |
| 10 | 5/8 | 0.625 |
| 11 | 11/16 | 0.6875 |
| 12 | 3/4 | 0.75 |
| 13 | 13/16 | 0.8125 |
| 14 | 7/8 | 0.875 |
| 15 | 15/16 | 0.9375 |
For example, the seventh 1/16-inch space after the 3-inch mark represents 3 7/16 inches.
Understanding common fractions such as 1/4, 3/8, 1/2, and 5/8 inch will help you read most everyday tape measurements. When working with detailed measurements, however, you may need finer divisions or their decimal and metric equivalents.
Our detailed tape measure fraction chart provides an extended reference covering 1/16, 1/32, and 1/64-inch fractions for quick and accurate conversions.
You do not need to memorize every fraction. Start by finding the 1/2-inch and 1/4-inch lines. Then use the shorter marks to narrow down the reading.
Remember that 12 inches equal 1 foot (30.48 cm). Some tapes highlight every foot, while others continue numbering the inches. If the tape shows 26 inches, that is the same as 2 feet 2 inches.
How to Read a Metric Measuring Tape
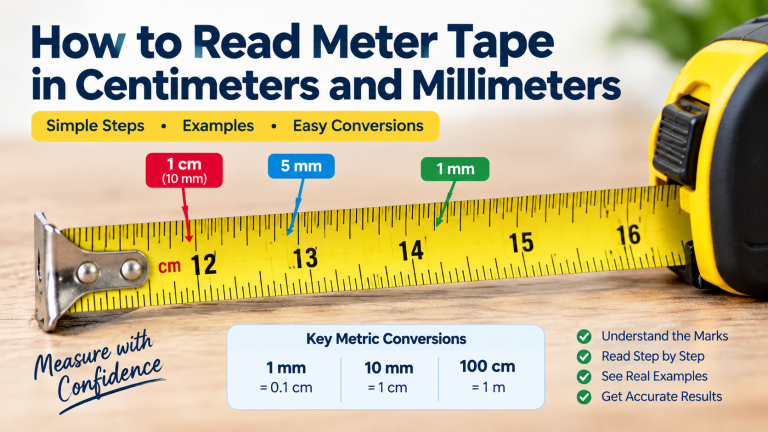
A metric tape uses millimeters, centimeters, and sometimes meters. You count in groups of 10 instead of dividing an inch into fractions.
One centimeter (cm) equals 10 millimeters (mm), and one meter (m) equals 100 centimeters. Many metric tapes have numbered centimeter lines, with smaller millimeter marks between them.
Metric measuring tapes are generally easier to understand once you recognize that each centimeter contains ten millimeters.
However, reading precise metric measurements and using a tape with both metric and imperial markings can still be confusing for beginners. Our metric tape reading instructions explain how to identify these divisions, record measurements correctly, and work with dual-scale tapes.
| Metric marking | Measurement | What it tells you |
| Short division | 1 mm | One-tenth of a centimeter |
| Middle division | 5 mm | Half a centimeter |
| Numbered centimeter | 10 mm | One whole centimeter |
| 100 cm or 1 m | 1,000 mm | One whole meter |
For example, if an object ends 8 small divisions after the 16 cm line, its length is:
16 cm + 8 mm = 16.8 cm
Or, in millimeters:
(16 × 10) + 8 = 168 mm
A metric tape can be easier to read if you are not comfortable with fractions. However, always check the smallest marked division before assuming it represents 1 mm.
How to tell inches from centimeters
On a dual-scale tape, the inch and metric scales may appear along opposite edges or on different sides of the blade.
Look for these clues:
Do not assume the upper edge always shows inches. The layout varies by manufacturer.
Worked Examples: How to Read Tape Measure Measurements
The best way to learn is to work through actual readings. Use the same rule for each example: find the whole number, count the smaller divisions, and combine them.
Example 1: Read 7 5/16 inches
Suppose the edge of a wooden board lines up with the fifth 1/16-inch space after the 7-inch mark.
- Find the last whole inch: 7 inches.
- Count five 1/16-inch spaces: 5/16 inch.
- Add them together: 7 + 5/16 = 7 5/16 inches.
Answer: 7 5/16 inches (about 185.7 mm).
In decimal form, this is 7.3125 inches.
Using the exact conversion of 25.4 mm per inch:
7.3125 × 25.4 = 185.7375 mm.
Example 2: Read a measurement longer than 2 feet
Imagine a shelf that ends at the sixth 1/16-inch space after the 27-inch mark.
- Read the whole number: 27 inches.
- Count six 1/16-inch spaces: 6/16 = 3/8 inch.
- Combine them: 27 + 3/8 = 27 3/8 inches.
- Convert the whole inches into feet: 27 inches = 2 feet 3 inches.
Answer: 2 feet 3 3/8 inches (about 695.3 mm).
Notice that the fraction stays attached to the extra inches. You do not add another foot when reading the small lines.
Example 3: Read 14 cm and 7 mm
Suppose a notebook ends at the seventh small millimeter division after the 14 cm mark.
- Find the last numbered centimeter: 14 cm.
- Count the remaining divisions: 7 mm.
- Convert 14 cm to millimeters: 14 × 10 = 140 mm.
- Add the extra 7 mm: 140 + 7 = 147 mm.
Answer: 14.7 cm, or 147 mm (about 5.79 inches).
Metric readings use decimal centimeters when needed, so 14 cm and 7 mm becomes 14.7 cm, not 14.07 cm.
How to Measure Correctly With a Tape Measure
Knowing the numbers is only half the job. The way you position the tape can change the result, even when you read every line correctly.
Start with the object on a stable surface where possible. Hook the tape over the starting edge, pull it straight along the measurement direction, and read where the opposite edge meets the scale.
Understand the moving end hook
Most retractable metal tape measures have a small hook that moves slightly. This movement is normally intentional.
When measuring across the outside of an object, pulling the hook against the edge shifts it outward. When measuring from an inside surface, pushing the hook against that surface shifts it inward.
The movement is designed to compensate for the hook’s own thickness. It helps the tape read correctly in both positions.
Do not tighten the hook screws just because the hook moves. But if the hook is bent, damaged, or moves more than intended, check the tape before relying on it.
Start at the 1-inch mark when needed
If the end hook is damaged or awkward to position, you can sometimes avoid using it by starting at the 1-inch mark.
This method is often called burning an inch.
For example:
- Place the tape’s 1-inch line at the object’s starting edge.
- Read the opposite edge at 9 5/8 inches.
- Subtract the 1 inch used at the beginning.
9 5/8 − 1 = 8 5/8 inches.
The actual length is 8 5/8 inches, or about 219.1 mm.
Do not forget to subtract that starting inch.
For inside measurements, such as between two walls, avoid bending the blade sharply into a corner. If the case has a printed case-length measurement, verify it before adding it to your reading. Another method is to make two marks from a common reference point and calculate the distance between them.
Why Your Tape Measure Reading May Be Wrong
Even when you understand the scale, real measurements can differ from the ideal value. A tape’s markings tell you where to read, but they do not guarantee perfect accuracy.
Here are the main reasons measurements can vary.
A damaged end hook: If the hook is bent or no longer moves correctly, the starting point can shift. This creates a zero error, meaning the measured zero does not match the true starting point.
Reading from an angle: When your eyes are not directly above the line, you may see the mark in the wrong position. This viewing error is called parallax.
A curved or sagging blade: A tape that does not follow the intended straight measurement path can give an incorrect length. The problem matters more on long measurements.
Worn or unclear markings: Scratches, dirt, and faded lines can make a small fraction hard to identify.
Temperature changes: Metal tapes and the objects being measured can expand or contract as temperatures change. The effect is usually small in ordinary indoor DIY work but can matter over long distances or in high-precision work.
Different measuring techniques: Changing hook pressure, tape alignment, or the exact starting point between readings can cause inconsistent results.
How to check your tape measure at home
A simple comparison can help you spot a problem.
- Place a reliable steel ruler on a flat surface beside your tape.
- Align the tape’s starting point with the ruler’s zero and compare several marked lengths, such as 2, 6, and 12 inches, or 50, 100, and 300 mm if your reference ruler supports those lengths.
- Check readings with the hook pulled outward and pushed inward, as appropriate.
- Repeat the comparison with the tape flat and straight.
If the measurements differ consistently, inspect the hook and blade. If the ruler itself has unknown accuracy, the test can reveal disagreement but cannot prove which tool is correct.
For work that requires a defined tolerance, use a measuring tool with suitable verified accuracy.
Remember: A tape with 1/16-inch markings does not automatically measure accurately to within 1/16 inch. Marking resolution and actual measurement accuracy are different things.
Common Mistakes When Reading a Tape Measure
Most reading errors come from a few simple habits. Check these points before marking material or recording a measurement.
- Using the wrong scale. Make sure you are reading inches or centimeters, not switching between them halfway through.
- Counting all lines as equal-sized marks. The marks on an inch tape can represent different fractions. Use the line lengths and 1/16-inch spacing to identify the correct one.
- Reading the printed number instead of its line. A large numeral identifies a nearby whole-unit mark. The line, not the middle of the numeral, gives the measurement.
- Forgetting the fractional part. If an edge passes the 10-inch line by 3/8 inch, the result is 10 3/8 inches, not 10 inches.
- Holding the tape at an angle. Keep the measuring edge aligned with the actual length. An angled path across a flat object may be longer than the dimension you want.
- Ignoring the starting point. If you begin at 1 inch or another mark instead of zero, subtract that starting reading from the endpoint reading.
- Reporting more precision than you can see. If an edge falls between marks, describe the result as approximate. Do not report extra decimal places as though you measured them exactly.
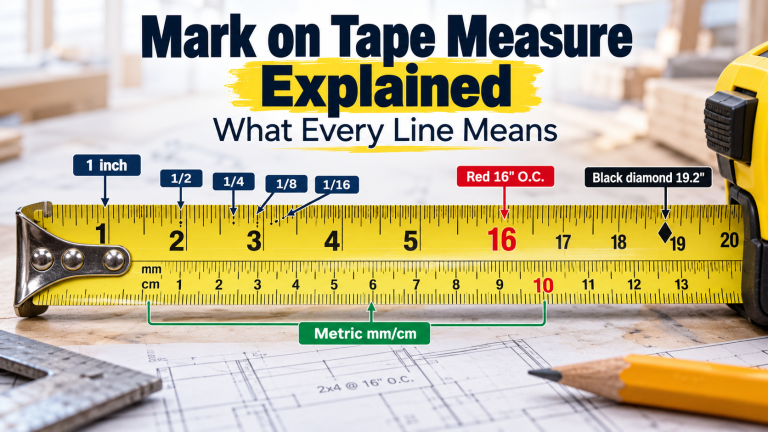
Another common mistake is assuming that every colored number or unusual symbol represents a measurement division. In reality, some tape measures include special indicators such as red 16-inch framing numbers and black diamond marks used for layout spacing.
If you encounter unfamiliar marks on a tape measure, understanding their intended purpose will help you avoid confusing construction reference symbols with ordinary measurements.
Frequently Asked Questions About Reading a Tape Measure
These quick answers cover common questions that come up when learning to read a measuring tape.
What are the smallest lines on a tape measure?
On many inch tapes, the smallest marked lines represent 1/16 inch, or 1.5875 mm. Some tapes show 1/32-inch divisions. On a common metric tape, the smallest lines usually represent 1 mm.
How do you find 3/8 inch on a tape measure?
Find the point halfway between 1/4 inch and 1/2 inch. On a tape divided into sixteenths, 3/8 inch is the sixth 1/16-inch space after a whole-inch mark.
How do you read a tape measure without knowing fractions?
Start by learning the longest marks: whole inches, halves, and quarters. Then count the smaller 1/16-inch spaces using the chart above. A tape with fractions printed directly can also make reading easier.
Why is the metal end of my tape measure loose?
A small amount of movement is normally built into the end hook. It compensates for the hook’s thickness when you push or pull against a surface. Excessive movement, bending, or damage can cause wrong readings.
Is a metric tape measure more accurate than an inch tape?
Not automatically. A 1 mm scale has finer marked divisions than a 1/16-inch scale, but the tape’s construction, condition, and how you use it determine the actual accuracy. Choose a scale you can read clearly and the precision your project requires.
Final Thoughts
Reading a tape measure gets easier when you stop trying to memorize every small line. Find the last whole number, identify the smaller division, and add the two together. On most inch tapes, counting sixteenths is the key. On metric tapes, count millimeters.
With a little practice, you should be able to read ordinary household measurements without guessing. For better results, keep the tape straight, check the end hook, and repeat important measurements before cutting or fitting materials.


One Comment
Comments are closed.