
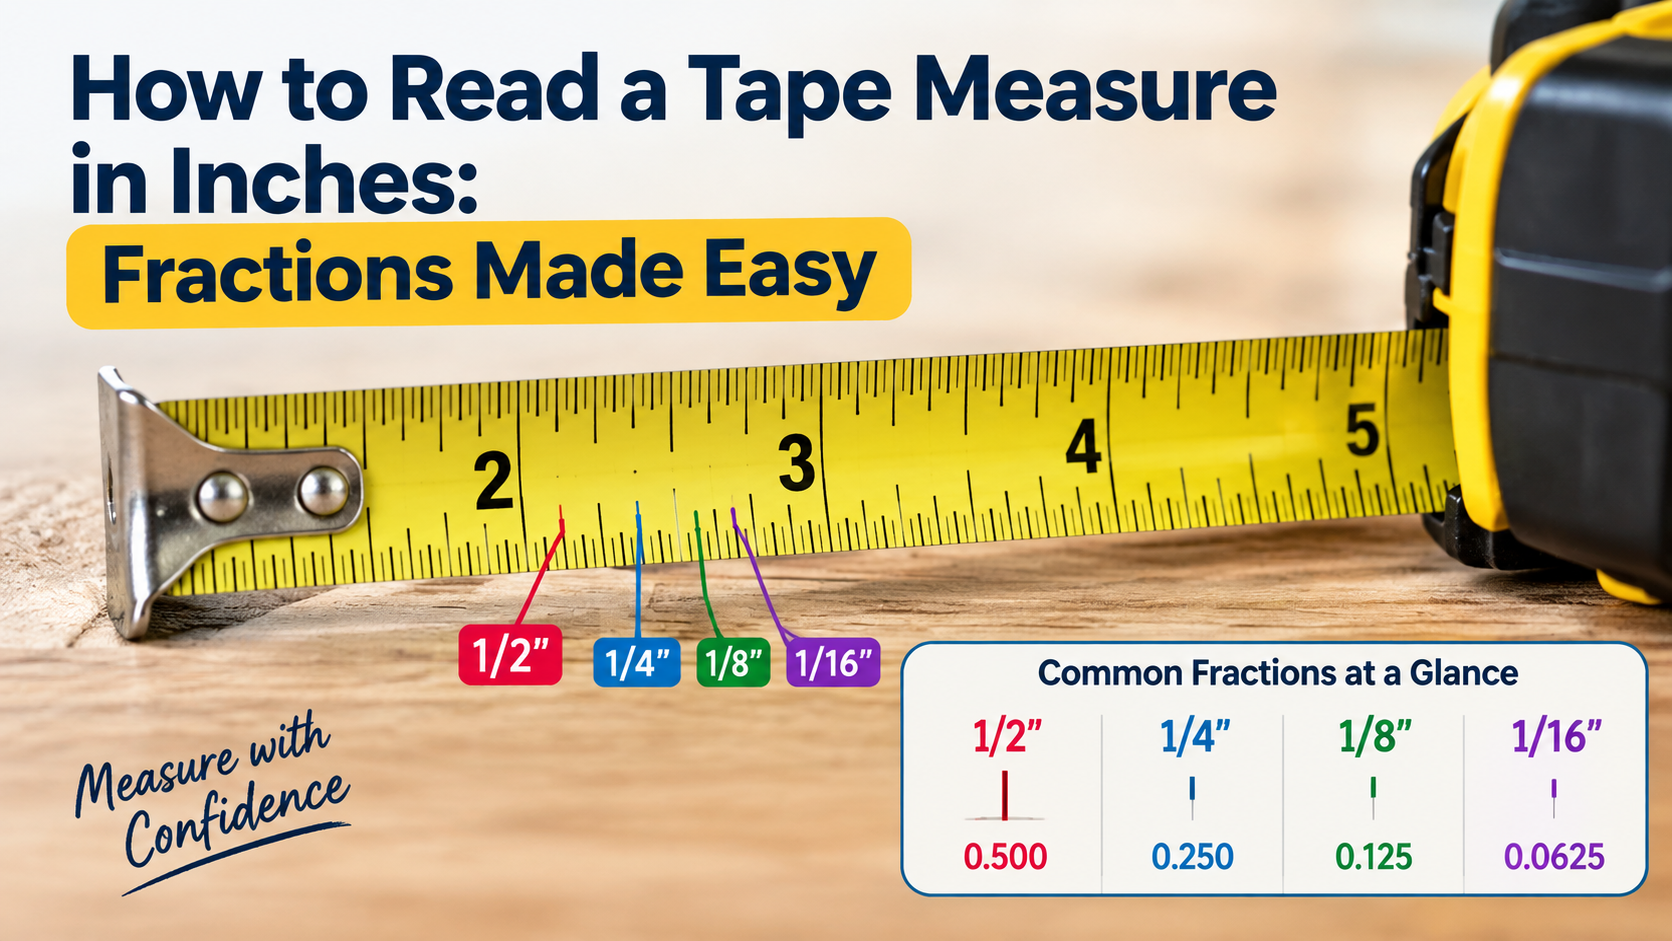
To read a tape measure in inches, find the last whole-inch number, count the smaller marks after it, and add the fraction. Most common inch-based tape measures divide each inch into 16 equal parts. These marks represent 1/2, 1/4, 1/8, and 1/16 inch. For example, the sixth 1/16-inch interval equals 6/16, or 3/8 inch.
The exact reading depends on the smallest marks on your tape and where the object’s edge falls. Some tapes have extra markings, while others use simpler scales. This guide explains how to read a measuring tape in inches, recognize fractions, and measure everyday objects without confusing the lines.
Reading measurements in inches becomes easier once you understand how a tape measure is organized and how its numbers, lines, and hook work together.
If you are using a measuring tape for the first time, our complete beginner’s tape measure guide explains the essential steps for measuring accurately. You can then return to this tutorial to focus specifically on inch fractions and their positions along the scale.
How to Read a Tape Measure in Inches in 4 Steps
Reading an inch tape means combining a whole number with a fraction of an inch. The large numbered marks show whole inches, while the smaller lines show parts of an inch. You can read most everyday measurements using four simple steps.
- Find the starting point. Place the tape’s hook against the edge of the object. Keep the tape straight and make sure it starts at zero.
- Find the last full inch. Look for the largest printed number before the object’s ending edge. If the edge falls between 5 and 6 inches, start with 5 inches.
- Count the smaller marks. Identify the line that matches the object’s edge. On a tape divided into sixteenths, every smallest interval adds 1/16 inch.
- Add the fraction. Combine the whole-inch number with the fraction and simplify it when possible.
For example, suppose an object ends at the fourth 1/16-inch interval after 5 inches.
The main rule is simple: whole inches + fractional inches = total measurement.
When you know this pattern, reading the tape becomes much easier.
What Do the Lines on a Tape Measure Mean?
Every line represents a specific distance from zero. On a typical tape with 1/16-inch divisions, longer lines mark larger fractions, while shorter lines identify smaller fractions.
You will usually see a repeating pattern between each pair of whole-inch numbers.
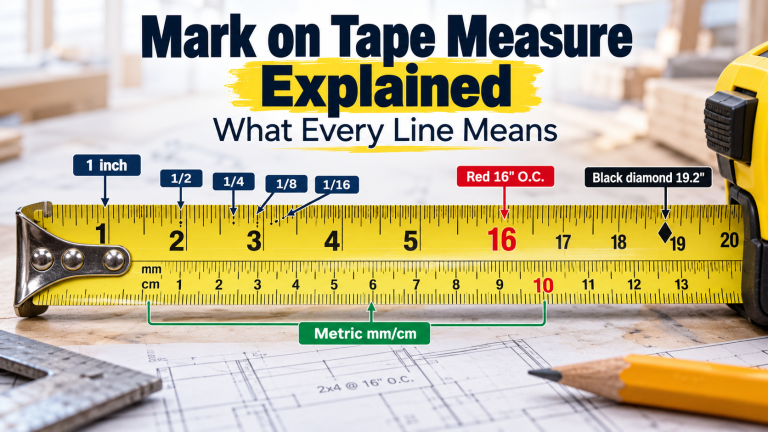
The lines between whole-inch numbers show fractional distances, but a measuring tape may also contain colored numbers, diamond-shaped symbols, and other indicators.
These additional markings often serve construction or layout purposes rather than showing a different measurement unit. Understanding special tape measure markings can help you distinguish ordinary fraction lines from symbols used for specific measuring tasks.
Understanding the Different Line Lengths
The following table explains the basic markings on a typical fractional-inch tape.
| Marking | How to recognize it | Position within one inch |
|---|---|---|
| 1 inch | Long numbered line | End of the full inch |
| 1/2 inch | Longest line between inch marks | Halfway |
| 1/4 inch | Shorter than the 1/2 line | 1/4 and 3/4 |
| 1/8 inch | Shorter than quarter-inch lines | Odd eighths: 1/8, 3/8, 5/8, 7/8 |
| 1/16 inch | Usually the shortest lines | Odd sixteenths, such as 1/16 and 3/16 |
The pattern repeats after every whole inch.
For example, the 1/2-inch line between 2 and 3 means 2 1/2 inches. The same type of line between 7 and 8 means 7 1/2 inches.
Check your own tape: The exact line lengths and printed labels may vary by manufacturer. Some tapes display fractions directly, and some include 1/32-inch divisions.
How Many Small Lines Are in One Inch?
A tape divided into sixteenths contains 16 equal intervals per inch.
That means there are 15 interior fractional tick positions between two consecutive whole-inch marks. The next full-inch line completes the sixteenth interval.
Each interval measures:
1 ÷ 16 = 0.0625 inch
Since 1 inch equals exactly 25.4 millimeters (mm), a single 1/16-inch interval equals 1.5875 mm. This conversion uses the internationally defined inch.
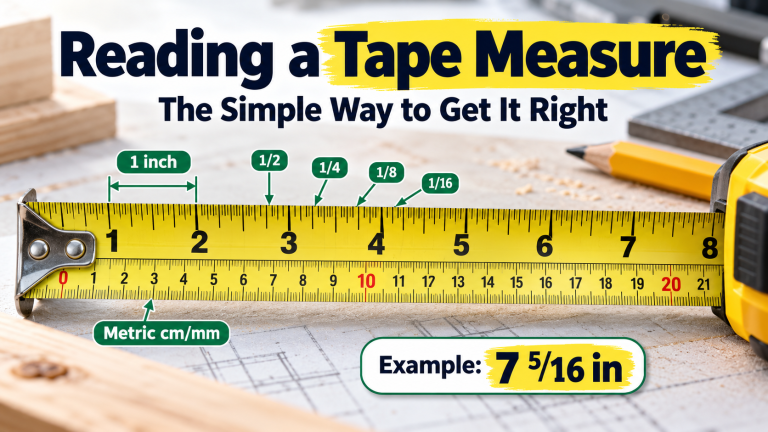
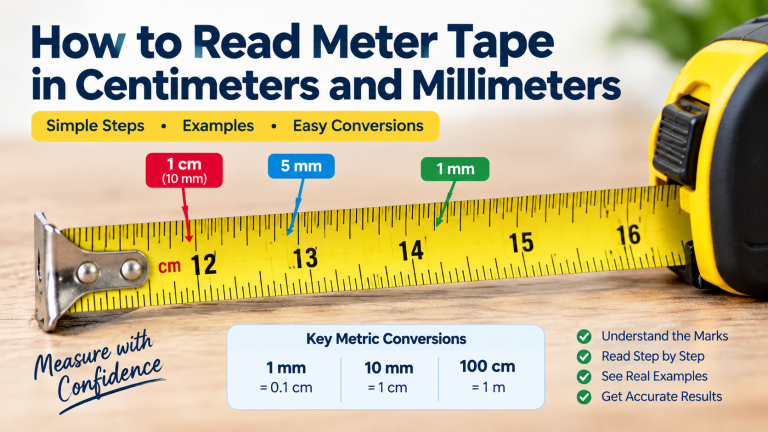
Although this guide focuses on inches and fractional markings, many modern tape measures also display a metric scale. Instead of dividing each inch into fractions, the metric side uses centimeters and millimeters to represent distance.
If your tape includes both systems, learning about reading centimeters and millimeters will help you switch between scales without confusing the markings.
For steel measuring tapes, ASME B89.1.7-2009 (R2024) is a relevant performance standard covering graduations, numbering, designations, and accuracy requirements. The 1/16-inch layout used here is a common tape pattern, not a claim that every tape has identical markings.
How to Read 1/2, 1/4, 1/8, and 1/16 Inch Fractions
The easiest way to learn measuring tape fractions is to start with the largest fraction and work toward the smallest. Each smaller unit divides the previous distance into two equal parts.
A fraction has two numbers. The top number, called the numerator, tells you how many parts you have. The bottom number, called the denominator, tells you how many equal parts make one whole.
Reading 1/2 Inch
Find the longest line halfway between two whole-inch numbers.
This represents 1/2 inch, which is the same as 8/16 inch or 12.7 mm.
For example, halfway between 6 and 7 inches is 6 1/2 inches.
Reading 1/4 Inch
Divide the inch into four equal sections. The quarter-inch marks are at 1/4, 1/2, and 3/4 inch.
The first quarter mark after 3 inches represents 3 1/4 inches. The third quarter mark represents 3 3/4 inches.
Remember that 1/4 inch equals 4/16 inch or 6.35 mm.
Reading 1/8 Inch
An eighth-inch mark splits each quarter-inch section in half.
The eighth-inch positions include 1/8, 2/8, 3/8, 4/8, 5/8, 6/8, and 7/8 inch. Some simplify into familiar fractions.
For example:
One eighth of an inch equals 3.175 mm.
Reading 1/16 Inch
On a typical tape with 1/16-inch divisions, the smallest marks represent sixteenths.
You can count these intervals from the previous whole inch to find any fractional position. One sixteenth equals 0.0625 inch or 1.5875 mm.
Here is a quick way to recognize common readings.
| Count of 1/16-inch intervals | Simplified fraction | Decimal inches |
|---|---|---|
| 1 | 1/16 | 0.0625 |
| 2 | 1/8 | 0.125 |
| 4 | 1/4 | 0.25 |
| 6 | 3/8 | 0.375 |
| 8 | 1/2 | 0.5 |
| 12 | 3/4 | 0.75 |
| 14 | 7/8 | 0.875 |
You do not need to memorize every fraction immediately. Learn the half-inch and quarter-inch marks first, then count the smaller divisions between them.
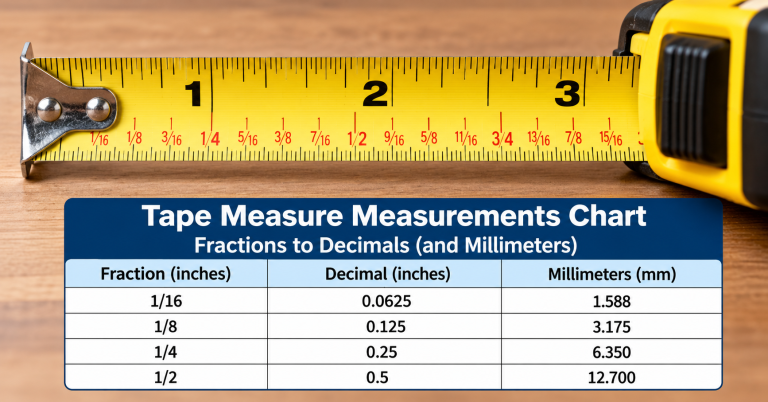
Learning to recognize sixteenth-inch divisions makes it easier to measure objects that fall between the larger fraction marks. However, you may also need to express these measurements as decimals or millimeters when working with different plans or tools.
A tape measure measurements chart provides quick fraction conversions, so you do not have to calculate every value manually.
Worked Examples: Reading a Tape Measure Correctly
The best way to understand fractions is to follow actual measurements. These examples assume you are using an inch tape with 1/16-inch divisions.
Example 1: How to Read Measuring Tape 3/8 Inch
Suppose an object’s edge lines up with the sixth small interval after the 2-inch mark.
- Find the last whole inch: 2 inches.
- Count six 1/16-inch intervals.
- Write the fraction as 6/16.
- Simplify by dividing the top and bottom by 2.
6/16 = 3/8
Answer: 2 3/8 inches (2.375 inches).
You can also find 3/8 inch without counting all six intervals. Locate the 1/4-inch mark and move one 1/8-inch interval forward.
1/4 + 1/8 = 3/8
This is often faster once you recognize the longer markings.
Example 2: How to Read 5/16 Inch
Imagine you are measuring a small wooden strip. Its edge reaches the fifth 1/16-inch interval after the 4-inch mark.
- Find 4 inches on the tape.
- Count five smallest intervals.
- Write the fraction as 5/16.
- Combine it with the whole inches.
4 + 5/16 = 4 5/16
Answer: 4 5/16 inches (4.3125 inches).
Because 5/16 cannot be reduced further, you keep the fraction as written.
Example 3: How to Read 2 11/16 Inches
Suppose your measurement ends at the eleventh 1/16-inch interval after 2 inches.
- Identify the 2-inch mark.
- Find the 1/2-inch line, which equals 8/16.
- Move three more 1/16-inch intervals.
- Add the fractions.
8/16 + 3/16 = 11/16
Answer: 2 11/16 inches (2.6875 inches).
Using the halfway mark as a reference is easier than counting eleven lines from the beginning.
Example 4: Reading More Than 12 Inches
The same method works beyond the first foot.
If an object’s edge lands three eighths past the 13-inch mark:
13 + 3/8 = 13 3/8 inches
Answer: 13 3/8 inches.
Remember that 12 inches equal 1 foot. You can express this result as 1 foot 1 3/8 inches.
How to Measure from the Hook Without Making Errors
Reading the marks correctly is only half the job. Your starting point must also be accurate.
Most retractable steel tapes have a small metal hook that grips an object’s edge. On many models, that hook moves slightly to compensate for its own thickness.
This movement is intentional. It supports both outside measurements, where you pull against an edge, and inside measurements, where you push against a surface.
For an outside measurement, hook the tape over the edge and gently pull it straight. For an inside measurement, push the hook firmly against the starting surface.
If the hook is damaged or its movement seems excessive, check it against a reliable ruler.
You can also measure from the 1-inch mark instead of the hook. This method avoids a questionable hook position, but you must subtract 1 inch from the final tape reading.
For example, if you start at the 1-inch mark and the other edge reaches 9 1/4 inches:
9 1/4 − 1 = 8 1/4 inches
The actual length is 8 1/4 inches.
For measuring inside a corner using the tape case, add the manufacturer’s stated case length only if that method is supported by your tape’s design.
Why Real Tape Measurements Can Differ
Even when you understand every fraction, repeated measurements may not match perfectly. A tape measures length using physical markings, so the hook, blade condition, viewing angle, and measuring technique can affect the result.
Longer steel tapes can also be affected by temperature and tension. NIST accounts for measurement conditions when calibrating metal tapes, although ordinary household measurements usually need much less control.
| Possible cause | What happens | How to check |
|---|---|---|
| Bent or damaged hook | Starting zero may shift | Compare pull and push readings with a reliable ruler |
| Viewing angle (parallax) | A line appears offset when seen from the side | Look straight down at the mark |
| Curved or angled blade | The measurement may be longer than the straight distance | Keep the tape aligned and flat |
| Worn markings | Small fractions become hard to identify | Check the marks against another readable scale |
| Temperature or tension | Tape length can change slightly | Use suitable conditions for precision work |
A good self-check is to compare your tape at several positions, such as 1, 6, and 12 inches, with a trusted reference ruler.
Check the hook in both pulling and pushing positions. If the readings disagree beyond what your project allows, use another measuring tool or arrange an appropriate accuracy check.
Do not assume that a tape marked in sixteenths is accurate to within 1/16 inch. Scale resolution and measurement accuracy are different things.
For structural, safety-critical, or code-controlled work, have a qualified professional verify critical dimensions before installation.
Common Mistakes When Reading Tape Measure Inches
Most beginner mistakes come from confusing the fraction lines or moving the tape while reading. These six habits help prevent incorrect measurements.
- Confusing 3/8 with 3/16. On a 1/16-inch tape, 3/8 is the sixth small interval, not the third. Always consider the denominator.
- Using the next whole-inch number. If the object’s edge falls between 7 and 8 inches, start from 7, not 8.
- Ignoring the longer lines. Use the 1/2-inch and 1/4-inch marks as landmarks. They help you find smaller fractions quickly.
- Measuring with a loose or bent hook. Small hook movement can be normal, but damage can shift the starting point. Check the hook before relying on a critical reading.
- Holding the tape at an angle. Measure along the intended straight line. An angled tape can show a length greater than the distance you need.
- Writing down the wrong fraction. Say the measurement before recording it. For example, read “six and three eighths,” then write 6 3/8 inches.
A useful practice exercise is to mark 1/4, 3/8, 5/16, and 7/8 inch on paper using your tape. Measure the distances again without looking at your earlier answers.
This builds familiarity with the line pattern.
Frequently Asked Questions
These are common questions people ask when learning how to read tape measure inches.
1. How many lines are in one inch on a tape measure?
A typical tape with 1/16-inch divisions has 16 equal intervals and 15 interior fractional positions between two whole-inch marks. Some tapes use different divisions, so inspect your own scale.
2. What does 3/8 look like on a measuring tape?
The 3/8-inch mark sits halfway between 1/4 and 1/2 inch. On a tape marked in sixteenths, it is the sixth interval after the whole-inch line.
3. How do you read 1 3/8 inches on a tape measure?
Find the 1-inch mark and move another 3/8 inch. This is the sixth 1/16-inch interval after 1 inch. The result is 1 3/8 inches, or 1.375 inches.
4. What if my tape measure has 1/32-inch marks?
Each inch has 32 equal intervals rather than 16. The smallest division is 1/32 inch, and the eighth, quarter, and half-inch positions remain in the same places.
5. What if the object’s edge falls between two measurement lines?
Your measurement falls between the tape’s printed divisions. For everyday work, use the nearest mark when that precision is acceptable. For a tighter tolerance, use a suitable higher-resolution measuring tool rather than inventing extra digits.
Final Thoughts
Learning how to read a tape measure in inches becomes easier once you understand the repeating fraction pattern. Find the whole inch, identify the fractional mark, and combine the two numbers. Start with 1/2 and 1/4 inch before moving on to 1/8 and 1/16 inch.
For reliable measurements, keep the tape straight, check the hook, and read the correct line at eye level. With regular practice, you can recognize common inch fractions quickly without counting every small mark.


One Comment
Comments are closed.