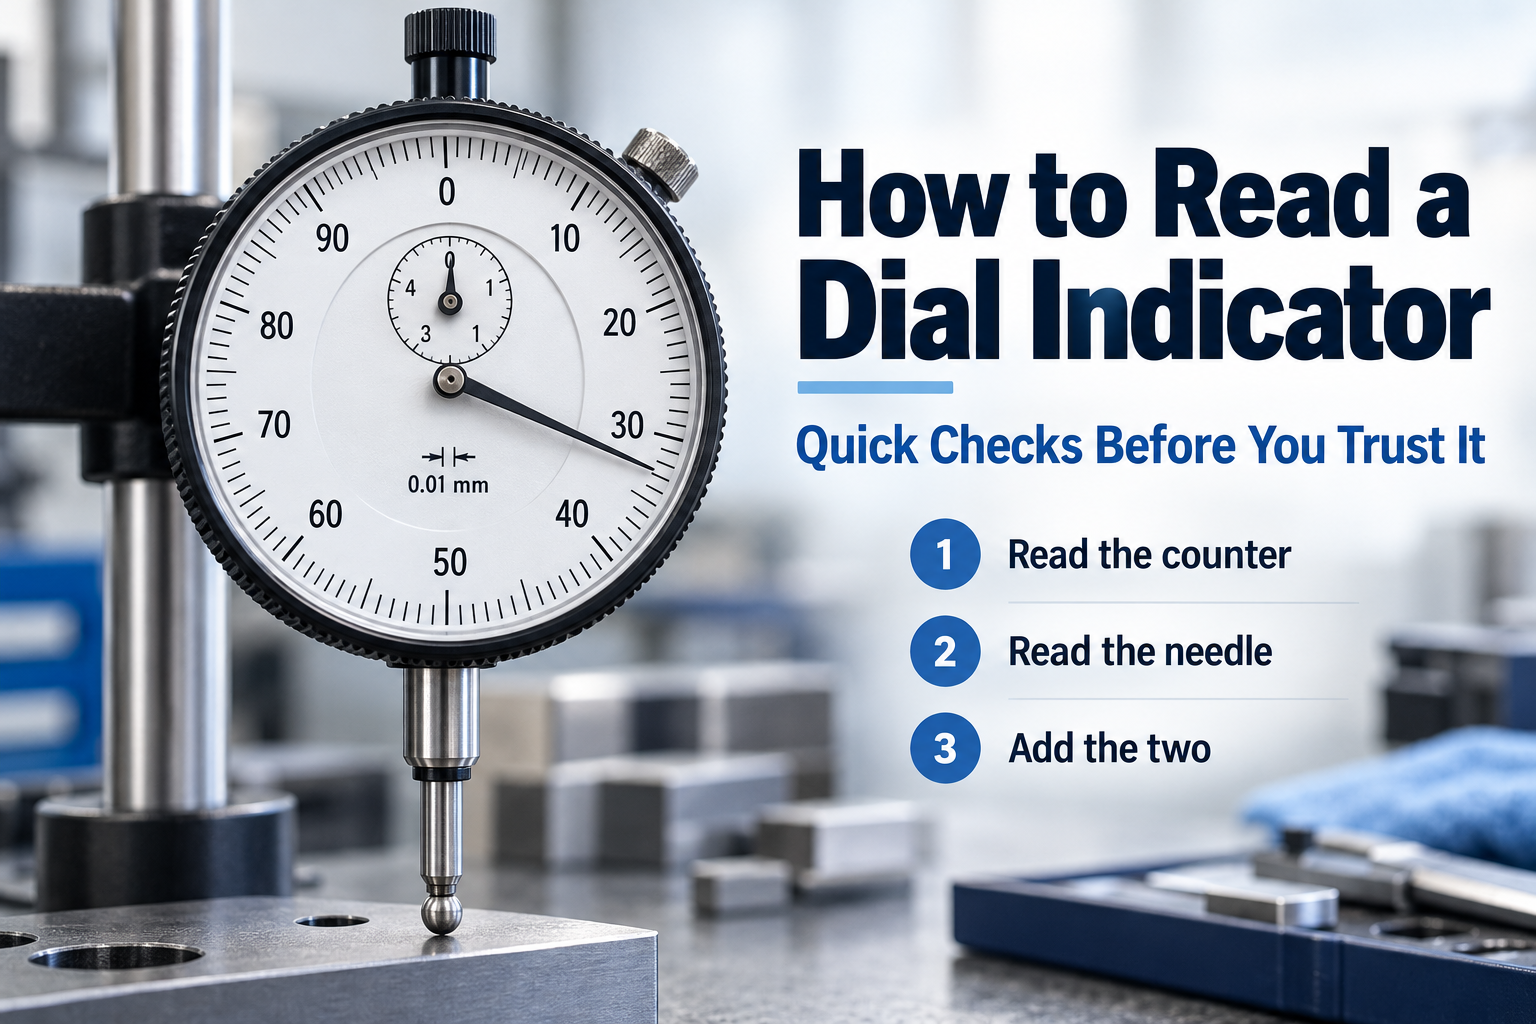
To read a dial indicator, read the small revolution counter for the whole turns, read the needle for the fine part, then add the two. On a common 0.01 mm gauge, each needle division is 0.01 mm and one full turn is 1 mm. On a common inch gauge, each division is 0.001 in and one full turn is 0.100 in.
Your exact reading depends on your dial face. Gauges differ in graduation, travel and numbering. This guide shows how to read the needle and counter, three worked examples, and five quick checks to run before you trust a reading. If you also need to mount the gauge, see our guide on dial gauge and magnetic stand setup.
Parts of a Dial Indicator and What They Show
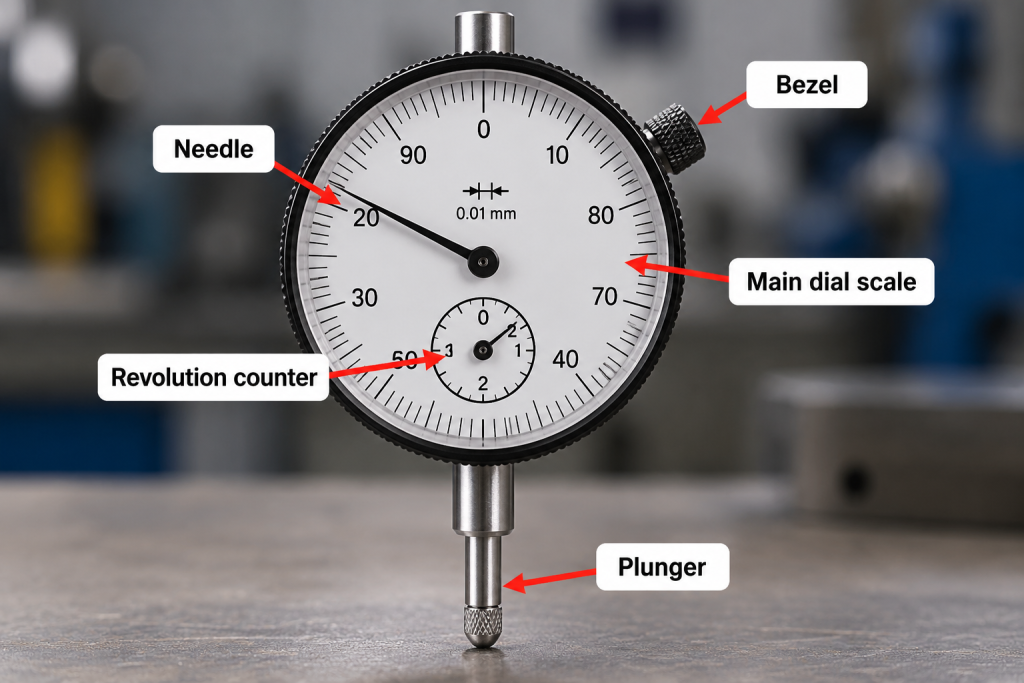
A dial indicator (also called a dial gauge) shows small plunger movement on a round dial. The needle shows the fine part of the reading. The small revolution counter shows the whole turns. Add the two to get the full reading.
Each part has one job. Knowing them stops most reading mistakes.
| Part | What it shows or does |
|---|---|
| Needle | Points to the fine part of the reading |
| Main dial scale | The marks the needle reads against |
| Revolution counter | Counts full needle turns on a small dial |
| Bezel | The ring you turn to set zero |
| Plunger | Moves in and out and drives the needle |
A related tool is the lever-type dial test indicator. It reads the same way but works over a much smaller range. See our guide on what a dial test indicator is for the differences.
How to Read a Dial Indicator Step by Step
Take your time with the first few readings. The method is the same for every gauge.
- Find the graduation. Look on the dial face for the smallest division value, such as 0.01 mm or 0.001 in.
- Find the value of one full turn. Many metric gauges use 1 mm per turn. Many inch gauges use 0.100 in per turn. Check your dial face to be sure.
- Read the revolution counter. The small pointer moves one number for each full needle turn.
- Read the needle. Count the divisions from zero to the needle. Look straight at the dial so the needle does not seem to shift.
- Add the two. Reading = (turns × value per turn) + (divisions × graduation).
- Check the direction. On most gauges, pushing the plunger in turns the needle clockwise. Confirm this on your gauge before you use the sign of a reading.
How to Read Dial Gauge Indicator Scales
Most gauges use one of two common scales. Your dial face prints the real values, so check them first.
| Gauge type | Smallest division | One full needle turn |
|---|---|---|
| Common metric | 0.01 mm | 1 mm |
| Common inch | 0.001 in | 0.100 in |
Finer gauges exist, so always read the value printed on your dial face. The numbers on the dial can run in two ways. A continuous dial counts up around the full circle (for example 0 to 100). A balanced dial counts up on both sides of zero (for example 0 to 50 each way). Balanced dials suit runout work because they show readings above and below zero.
Worked Examples: How to Read a Dial Gauge
Use this rule for every example: reading = (turns × value per turn) + (divisions × graduation).
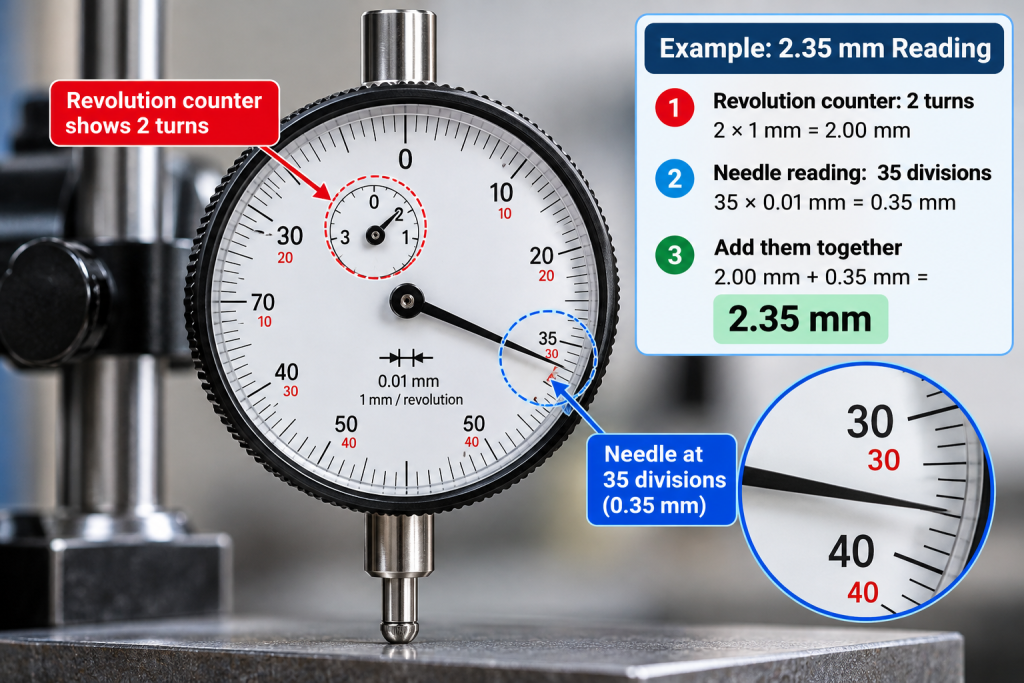
Example 1: metric gauge, 0.01 mm graduation, 1 mm per turn
- The revolution counter shows 2 turns: 2 × 1 mm = 2.00 mm.
- The needle sits at 35 divisions: 35 × 0.01 mm = 0.35 mm.
- Add them: 2.00 + 0.35 = 2.35 mm, which is about 0.0925 in.
Example 2: inch gauge, 0.001 in graduation, 0.100 in per turn
- The revolution counter shows 3 turns: 3 × 0.100 in = 0.300 in.
- The needle sits at 42 divisions: 42 × 0.001 in = 0.042 in.
- Add them: 0.300 + 0.042 = 0.342 in, which is about 8.69 mm.
Example 3: reading below zero on a balanced dial (0.01 mm)
- You zero the gauge. The counter shows 0.
- The needle sits 12 divisions left of zero: −12 × 0.01 mm = −0.12 mm (about −0.0047 in).
- Say the highest reading in the same check was +0.07 mm. The total spread is 0.07 − (−0.12) = 0.19 mm (about 0.0075 in).
Quick Checks Before You Trust a Dial Indicator
A gauge can look fine and still read wrong. These five checks take about two minutes. Run them before any important job.
| Check | What good looks like | If it fails |
|---|---|---|
| Push the plunger in a few mm and release | Needle returns to the same mark | Clean the plunger, then retest |
| Push in slowly | Needle moves evenly with no jumps | The plunger or gears may be dirty or damaged |
| Wiggle the plunger sideways | No obvious play | The bearing may be worn |
| Measure a gauge block or setting block | Reading matches within the gauge’s stated accuracy | Send for calibration |
| Measure the same spot 5 times | Same reading each time | Check the mount and clamp |
If you use a micrometer to compare sizes, our guide on how to read a micrometer shows that method.
Why Real Results Differ From the Ideal
Even a good gauge shows small errors. Know the common causes so you can spot them.
You can test your own gauge in three ways. First, zero it and measure a gauge block. Second, approach the same point from both directions and compare. Third, repeat the same measurement five times. If the numbers differ by more than one division, the gauge or setup needs attention.
Common Mistakes When Reading a Dial Indicator
Most wrong readings come from a handful of habits. Watch for these.
- Skipping the counter. Forgetting the whole turns leaves your answer off by 1 mm or 0.100 in.
- Using the wrong scale. Always check the graduation printed on the dial face.
- Ignoring the sign. Note which side of zero the needle sits on.
- Zeroing on a bad reference. Zero on a clean, flat, known surface.
- Skipping preload. Without it, the gauge can run out of travel. Our dial gauge and magnetic stand guide shows how to preload.
- Reading from the side. Look straight at the dial to avoid parallax.
- Leaving the bezel unlocked. A bump can move your zero.
FAQ
Q01. How do I read a dial indicator in thousandths? Each division is 0.001 in. Add the whole turns, at 0.100 in each, to the needle divisions. With 3 turns and the needle at 42, the reading is 0.342 in.
Q02. What do the big dial and the small dial mean? The big dial shows the fine part of the reading. The small dial counts full needle turns. Add them together.
Q03. What does a negative reading mean? It means the plunger moved out from your zero point. On a balanced dial, the needle sits to the left of zero.
Q04. How do I zero a dial indicator? Rest the plunger on a clean reference surface and preload it. Turn the bezel until zero sits under the needle. Lock the bezel if yours has a lock screw.
Q05. How accurate is a dial indicator? It depends on the gauge grade and condition. A fine division is not the same as accuracy. Check your manual for the stated accuracy and test the gauge on a known size.
Final Thoughts
Reading a dial indicator is simple once you follow one habit: find the graduation, read the counter, read the needle, then add. The quick checks before you measure matter just as much, since they confirm the gauge is moving smoothly and returning to zero.
Expect small differences from backlash, temperature and technique. Good practice cuts them down, but never to zero. If a reading matters, repeat it, check it against a known size and trust the pattern instead of a single number.