Have you ever wondered what’s hiding inside that sleek little handheld device that can measure across a room in seconds? A laser distance meter is packed with brilliant engineering. Inside a laser measuring device lies a sophisticated system of carefully designed parts working together in perfect harmony.
Let’s crack open the mystery and explore the laser meter internal structure. You’ll discover how these amazing instruments actually work. Whether you’re an engineering student, a construction pro, or just curious about technology, this guide will break down everything in simple terms.
What Is a Laser Distance Meter?
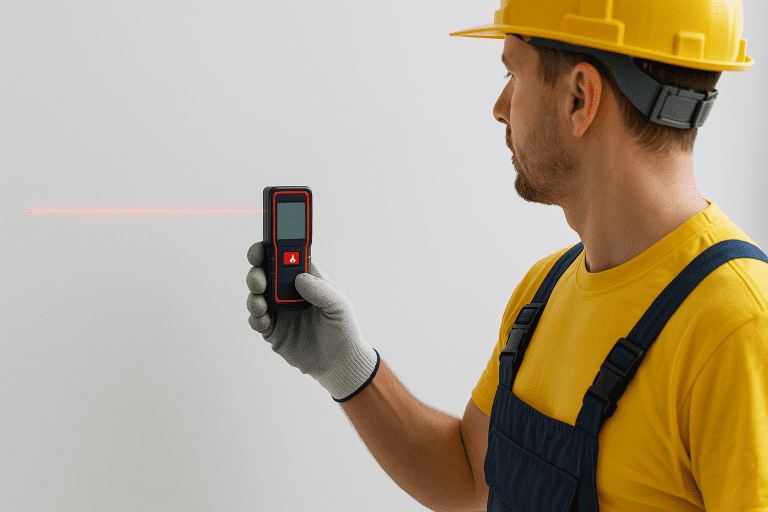
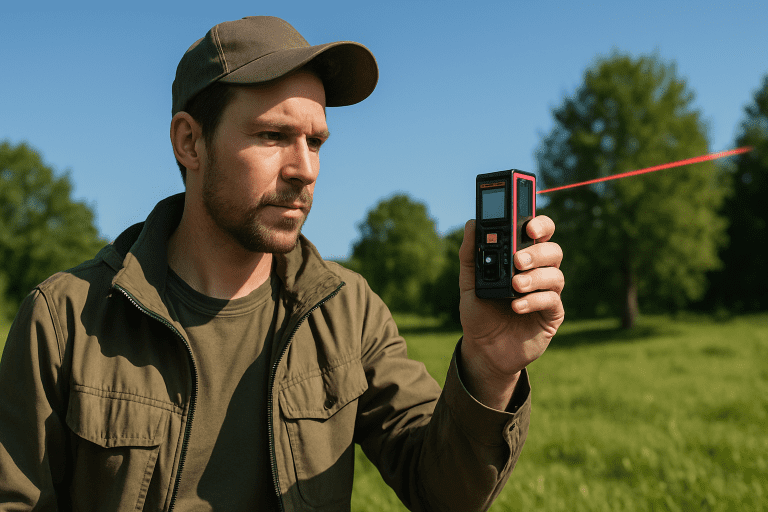
Before we dive into components of a laser distance meter, let’s start with the basics. A laser distance meter is a handheld measuring device that uses laser light to calculate distances quickly and accurately. Instead of rolling out a long tape measure, you point it at a target, press a button, and boom—you get your measurement instantly.
These tools have revolutionized how professionals work on job sites. Surveyors use them to map land. Architects rely on them for precise building measurements. Construction workers carry them daily. Even homeowners love them for DIY projects.
The magic happens through a laser measuring device’s internal components working as a unified measurement system. But how exactly does this work? Let’s find out.
How a Laser Distance Meter Works Internally
The basic principle is surprisingly elegant. A laser distance meter sends out a beam of infrared laser light. This light travels to your target, bounces off the surface, and returns to the device. The laser meter internal structure tracks how long this journey takes.
Here’s the clever part: light travels incredibly fast. It moves at about 186,000 miles per second. Even at this speed, the return trip takes measurable time. The device’s internal components calculate the distance based on this tiny time difference.
Think of it like radar, but using light instead of sound waves. Your laser measuring tool does this calculation in less than a second. That’s why you get results instantly.
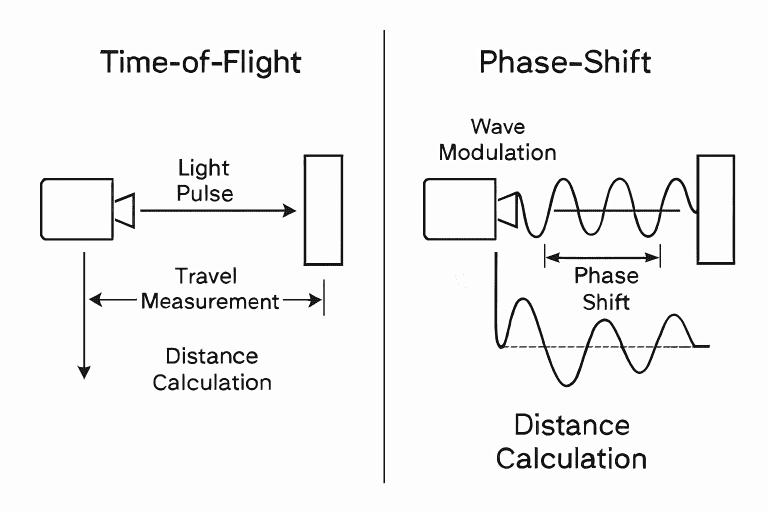
The device architecture of laser distance meters relies on two main measurement methods. Some devices use time-of-flight technology. Others use phase-shift measurement. Both methods work well but have different strengths. We’ll explore both later in this guide.
Essential Components
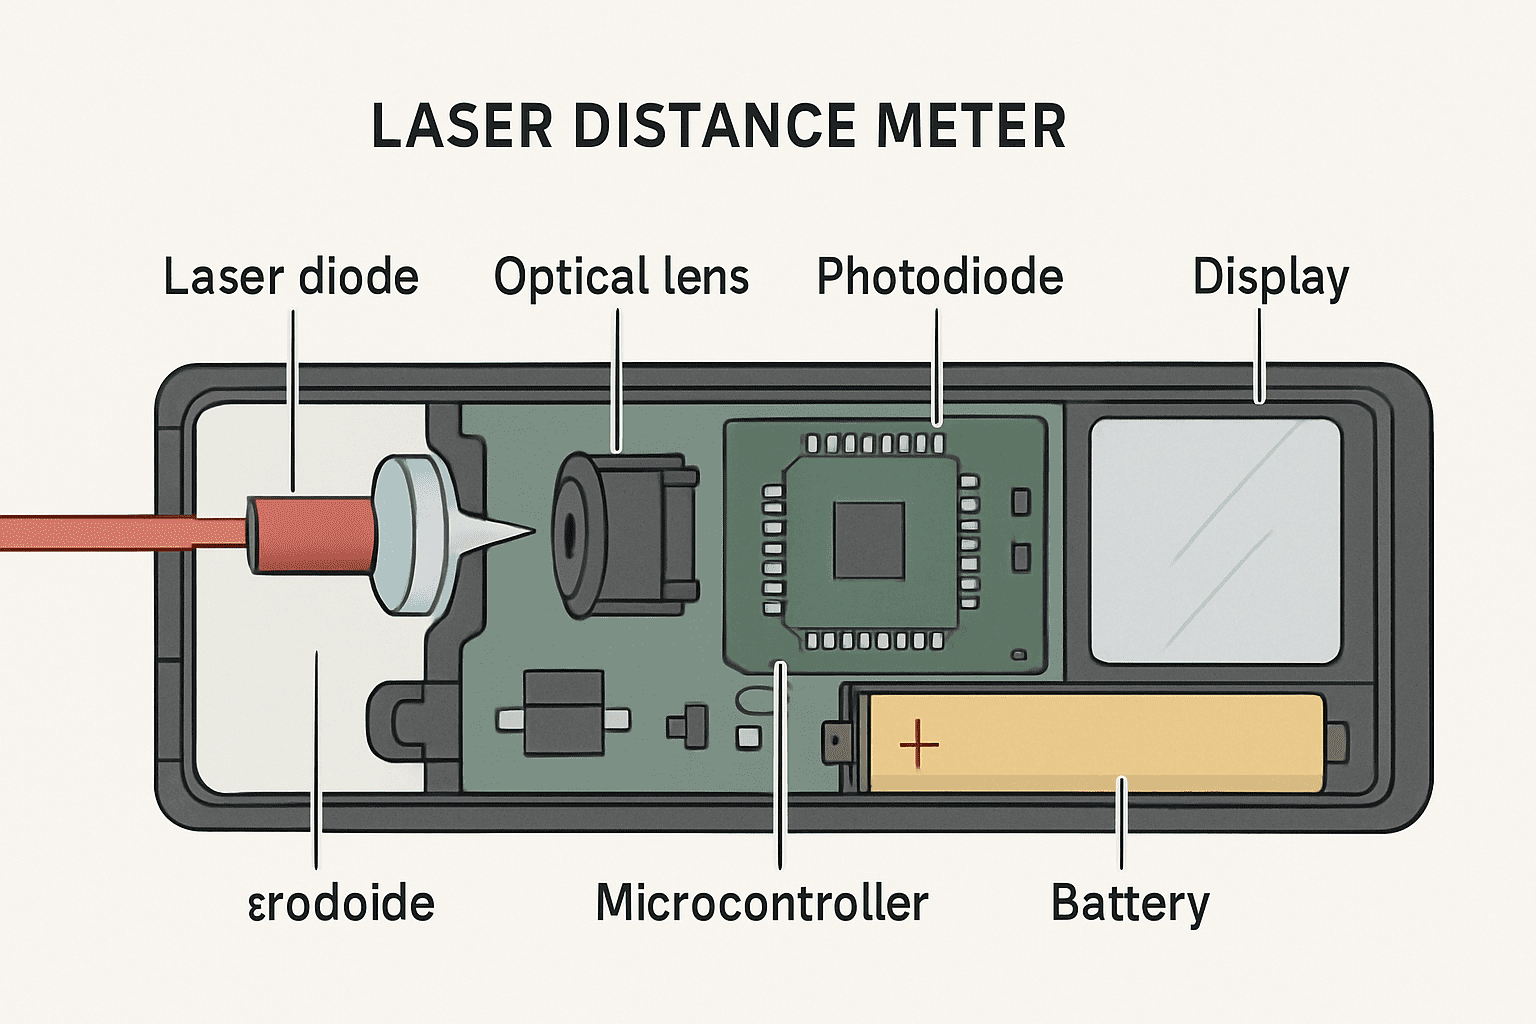
When you hold a laser distance meter, you’re holding seven interconnected systems working as one. Let’s break down parts of a laser distance measurer one by one.
Component 1: The Laser Emitter – Your Light Source
Deep inside your laser measuring device sits a tiny laser diode. This is your infrared laser diode—the heart of the measurement system. It’s incredibly small, sometimes just a few millimeters long, but it packs tremendous power.
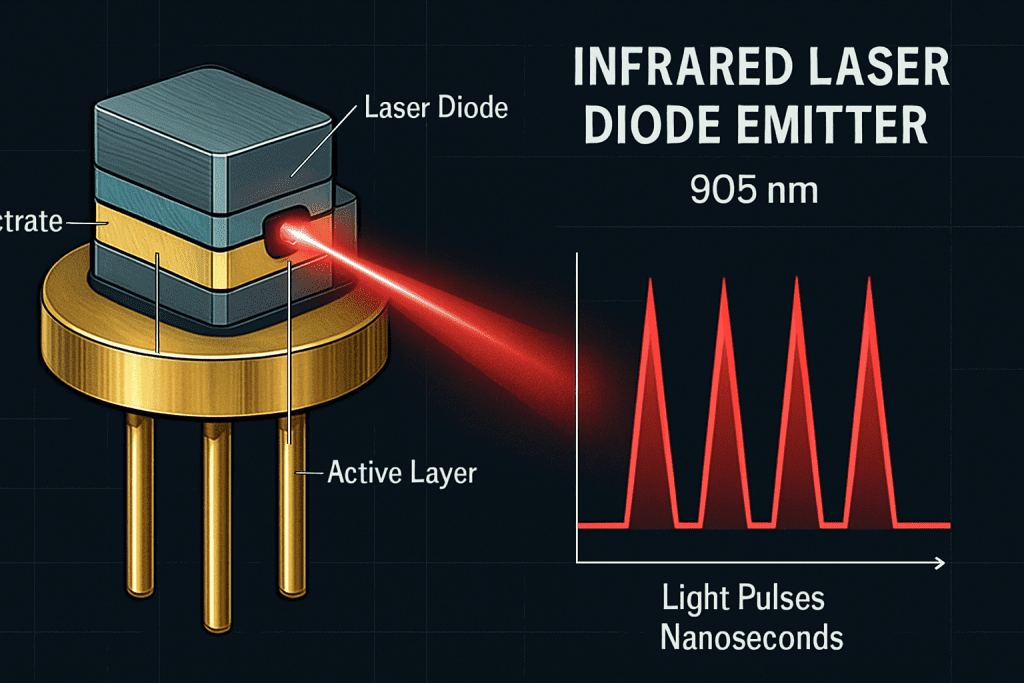
This laser emitter creates the beam that starts everything. It generates infrared laser light at specific wavelengths. Most distance meters use 905 nanometers (nm) or 1550 nm wavelengths. These are infrared frequencies invisible to the human eye.
Why infrared? Several reasons work in its favor:
The infrared laser diode fires in short pulses. Each pulse lasts only nanoseconds. The device might fire hundreds of pulses to get one measurement. This rapid-fire approach ensures accuracy.
The laser emitter stays connected to your device’s power source. It needs precise timing signals from the signal processor to know when to fire. The optical sensor system guides the beam toward your target.
Component 2: The Optical Lens System – Focusing and Directing
Now here’s where the laser rangefinder components get clever. The optical sensor in your laser measuring tool includes carefully designed lenses. These aren’t simple magnifying glasses. They’re precision-engineered optical components.
The laser meter internal structure includes two separate optical paths. The first sends your laser beam outward. The second catches the returning light.
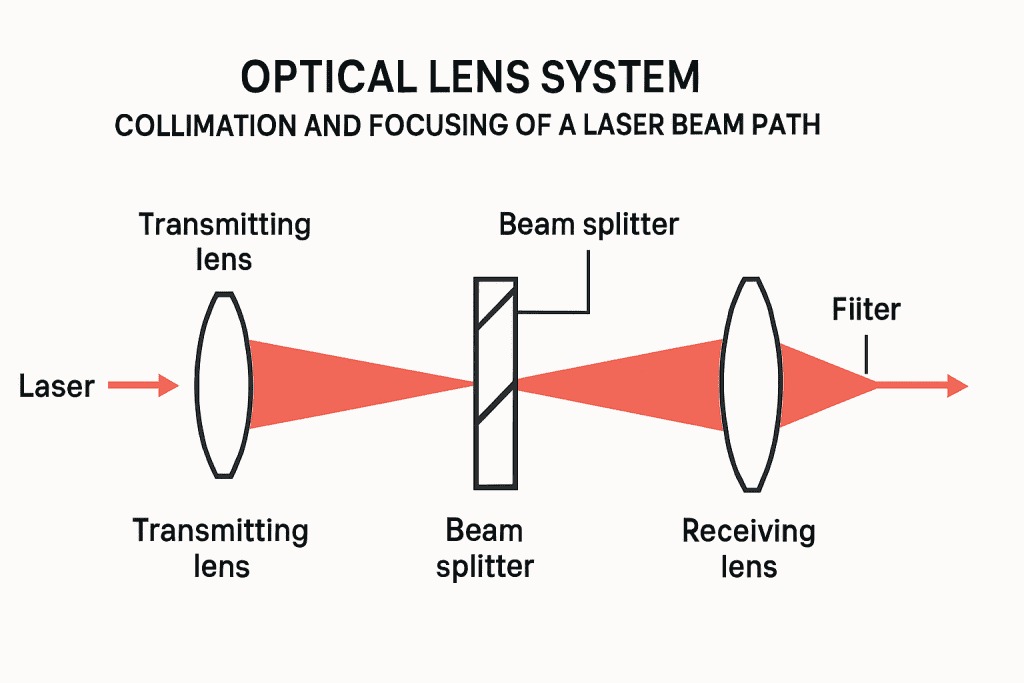
On the transmission side, special lenses collimate the beam. Collimation means making parallel rays from a point source. Without collimation, your laser light would spread out like a flashlight beam. Instead, it stays focused and narrow even at long distances.
The beam splitter plays a crucial role here. This optical component separates outgoing and incoming light. It lets the laser diode’s beam exit while directing reflected light toward the receiver.
On the receiving side, another lens focuses the bounced light onto your photodiode receiver. This focusing is critical. The returning light is extremely dim after traveling hundreds of feet and bouncing back. You need to concentrate every photon onto your detector.
The optical path includes filters too. These filters block ambient light and other infrared sources. They ensure that only light from your device’s laser reaches the photodiode receiver. This filtering dramatically improves accuracy and range.
Quality optics directly affect your laser distance meter’s performance. Better lenses mean:
This is why professional-grade instruments have superior optical sensor systems compared to budget models.
Component 3: The Photodiode Receiver – Capturing the Return Signal
The beam bounces back from your target and returns to your laser measuring device. Now what? The optical sensor in your device needs to catch this faint returning light.
That’s the job of your photodiode receiver. This optical sensor component is incredibly sensitive. It detects individual photons (particles of light). When light hits it, the photodiode generates an electrical signal.
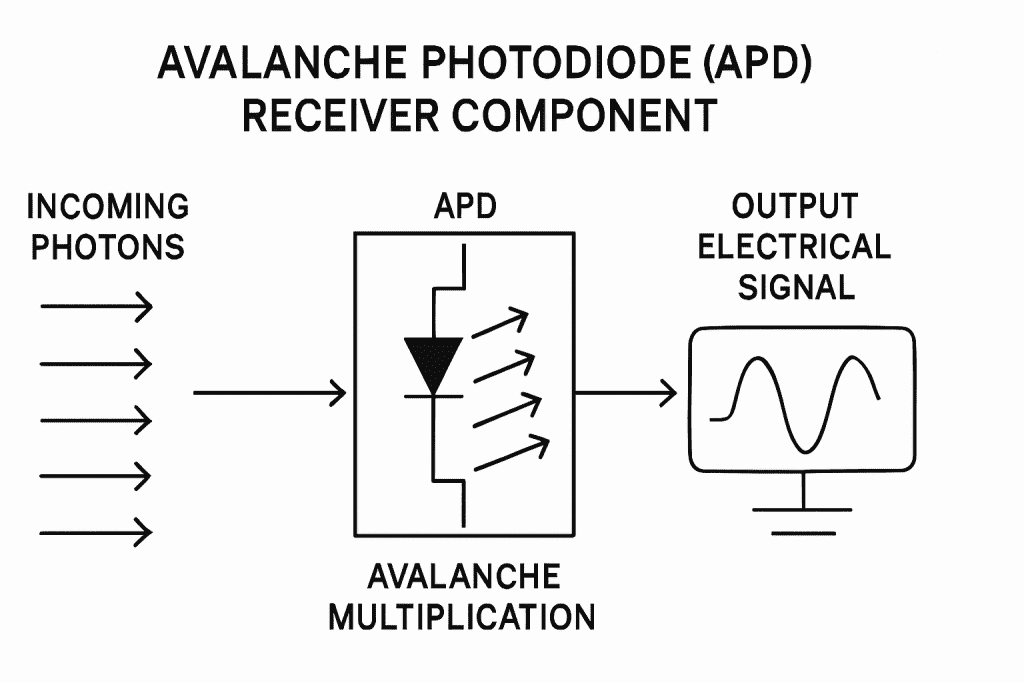
Most modern distance meters use an avalanche photodiode (APD). This photodiode receiver is extra sensitive. It amplifies the signal internally. This amplification lets the device detect very faint reflected light from distant targets.
The photodiode receiver sits at the end of your optical path. The reflected light focuses directly onto its tiny surface. The signal processor circuit amplifies the electronic signal from this photodiode.
Think of your photodiode receiver as the device’s eyes. Poor-quality photodiodes can’t detect faint signals. This limits how far your device can measure. Better photodiodes enable longer ranges and better performance in bright sunlight.
The photodiode output goes directly to the electronic filtering stage. This filtering removes noise and unwanted signals. The result is a clean electronic pulse that corresponds to your returning laser beam.
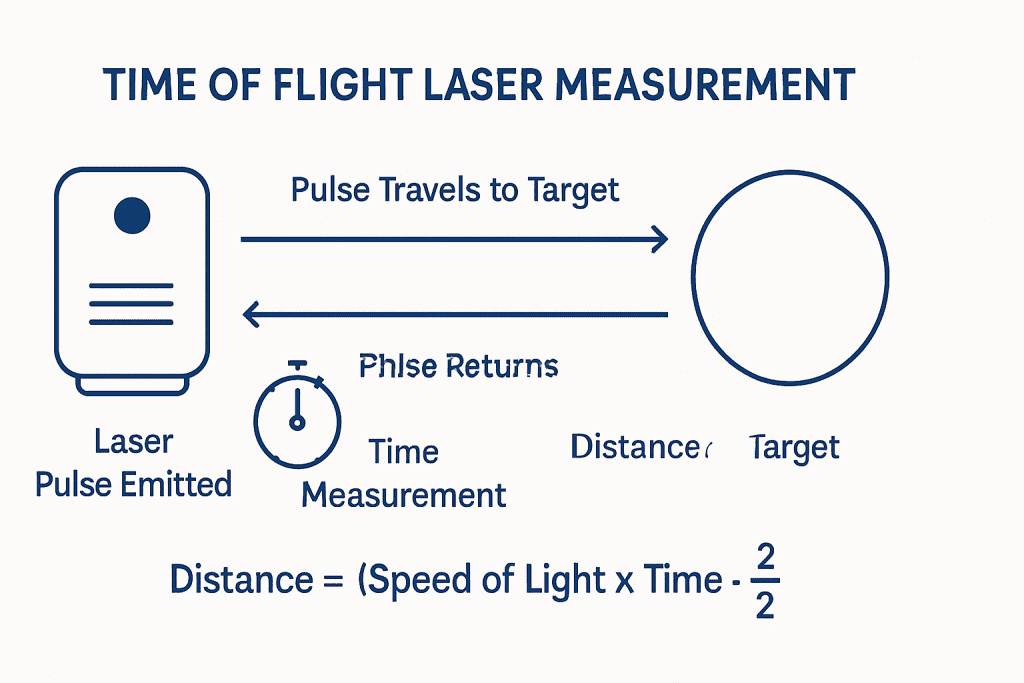
Component 4: Time-of-Flight Technology – The Calculation Engine
Here’s where the real magic happens inside your laser measuring device. The time-of-flight technology forms the calculation module of your measurement system.
Here’s the process:
- The signal processor sends a firing command to your infrared laser diode
- The laser emitter fires a short pulse of light
- Simultaneously, a high-speed timer starts counting
- Your laser beam travels toward the target at the speed of light
- The beam hits the target and reflects back
- Your photodiode receiver captures the returning light
- The timer stops immediately
- The microcontroller unit (MCU) calculates elapsed time
- Distance equals half the elapsed time multiplied by light speed (half because light travels to the target and back)
The speed of light is always 186,000 miles per second. This constant never changes. So if light takes one nanosecond for the round trip, the target is about 6 inches away.
Your device performs this calculation in microseconds. Then it displays the result on your digital display unit.
Time-of-flight technology is accurate. It works well for distances from a few inches to several hundred feet. Most handheld laser distance meters rely on this time-of-flight technology.
Component 5: Phase-Shift Measurement – An Alternative Approach
Some laser distance meters use a different method called phase-shift measurement. This approach works quite differently from time-of-flight.
Instead of measuring the time a pulse takes, phase-shift technology uses a continuous modulated beam. Imagine a light that turns on and off repeatedly at a precise frequency. Your infrared laser diode modulates (blinks) rapidly.
This modulated light travels to the target and bounces back. The return signal arrives with a phase shift—a timing difference compared to the outgoing signal. The phase difference tells you the distance.
Phase-shift measurement offers some advantages:
But it has some limitations:
Most professional construction tools use time-of-flight technology because it works well across a wide range of distances.
Component 6: The Microcontroller Unit – The Brain
Your laser measuring device needs intelligence to manage all these components. That’s where your microcontroller unit (MCU) comes in.
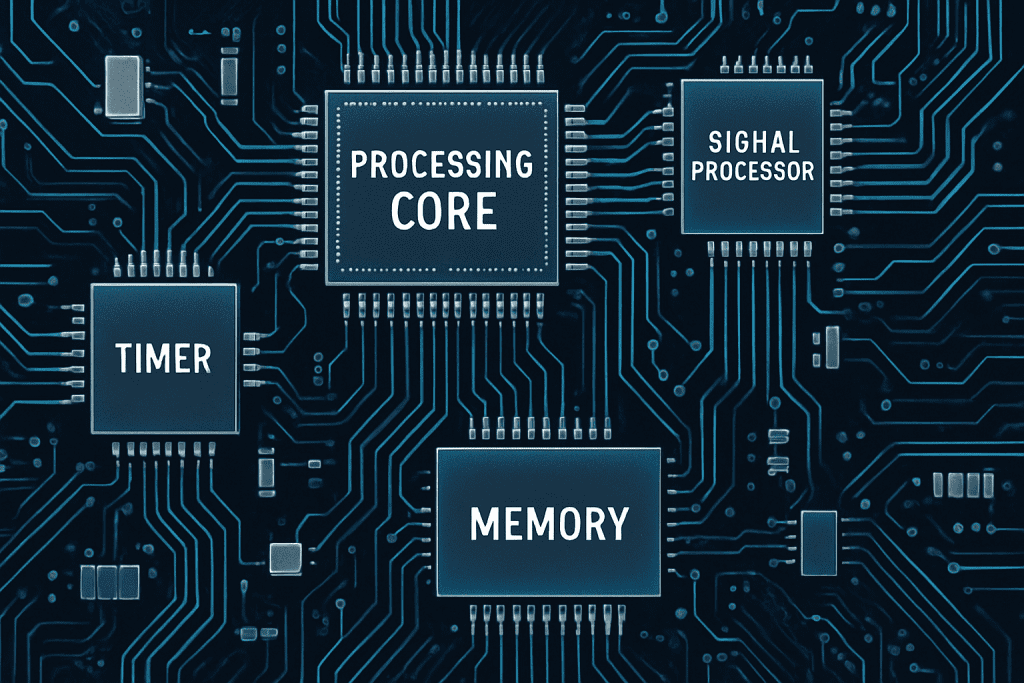
This tiny computer sits on the PCB board (printed circuit board) deep inside your device. The MCU is the true brain of your laser distance meter.
The microcontroller unit (MCU) performs several critical jobs:
The MCU runs firmware—small programs that tell it what to do. This firmware contains measurement algorithms. These algorithms handle noise filtering and error correction.
The electronics inside your laser measuring device would be impossible without modern microcontrollers. These tiny chips perform millions of calculations per second.
The signal processor works closely with the MCU. The signal processor handles the raw electronic data. It amplifies weak signals from your photodiode receiver. It filters out noise. Then it sends clean, usable data to the MCU for calculation.
Component 7: The Digital Display Unit – Showing Your Results
After all that internal processing, you need to see the result. That’s what your digital display unit does.
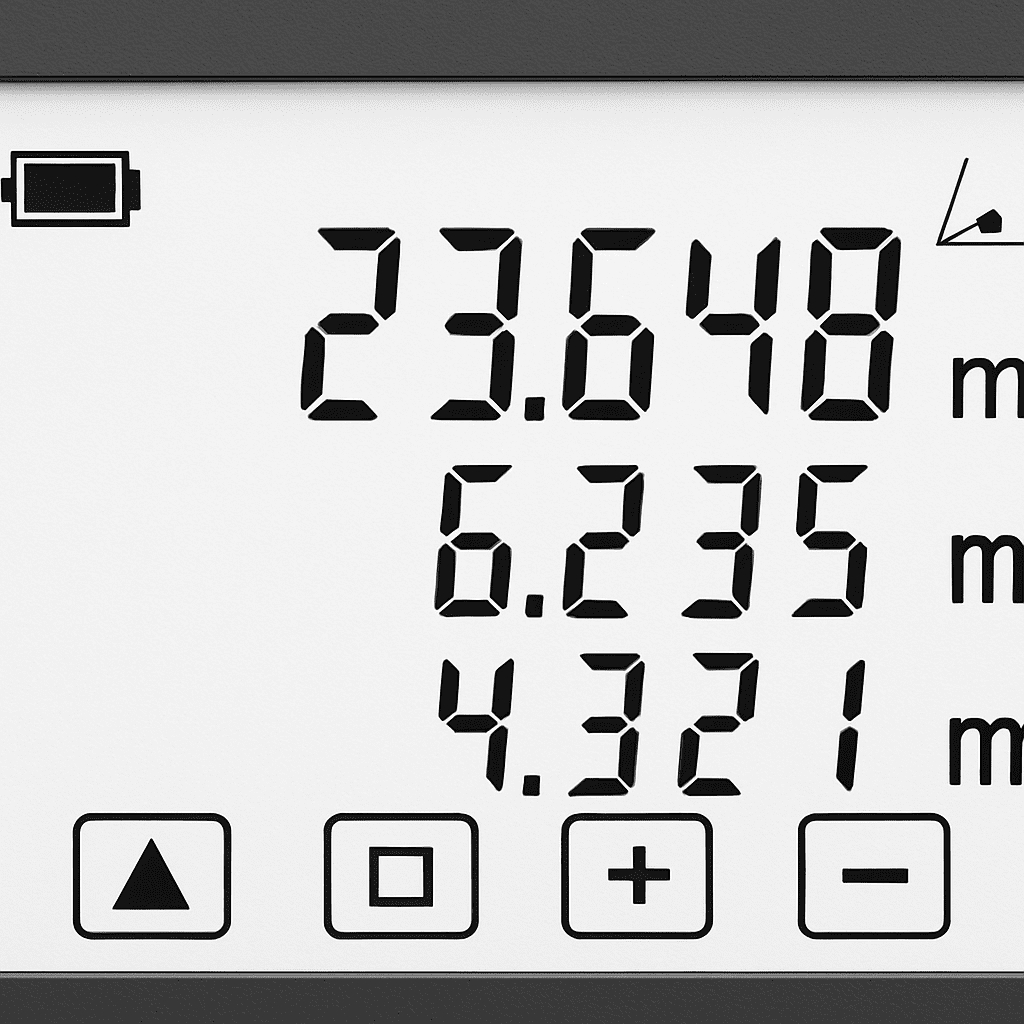
Most laser distance meters have an LCD screen. Some newer models feature OLED displays. These digital display units are backlit so you can read them in dim lighting.
Your digital display unit shows:
Modern laser distance meters often include extra features on the digital display unit:
The user interface includes control buttons arranged conveniently on the device body. These buttons let you switch measurement modes. They let you store and recall measurements. They control the digital display brightness.
Some premium models add a measurement mode selector with dedicated buttons for different measuring tasks. Others include environmental sensors like tilt sensors to measure angles. These sensors also feed data to your MCB for calculation.
Additional Components
Beyond the main seven components, your laser measuring device includes several supporting parts that make everything work smoothly.
The Power Management System
Your laser distance meter needs power. Inside sits a battery compartment holding rechargeable lithium batteries or disposable alkaline batteries.
The power management system regulates voltage throughout the device. Different components need different voltage levels. Your infrared laser diode might need high voltage for the pulse. Your MCB needs lower, steady voltage.
Battery life depends on several factors:
Most devices provide 5,000 to 50,000 measurements on a single battery charge. Some newer models use USB-C charging for convenience.
Protective Housing and Casing
Your laser measuring tool’s physical body protects all internal components. The housing uses durable materials like ABS plastic or reinforced rubber.
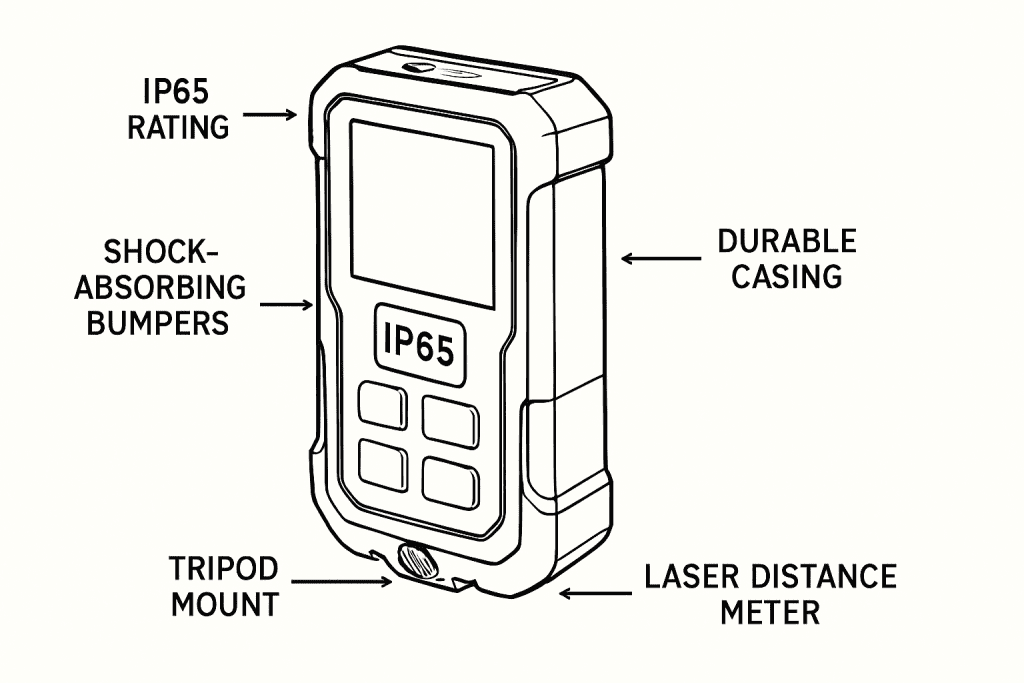
The protective housing includes several design features:
The IP rating tells you about water and dust protection. IP54 means basic protection. IP67 means you can submerge it briefly in water. These ratings matter on dusty construction sites.
The protective housing also features a laser aperture—the window where light enters and exits. This window uses special glass to protect internal optics while letting light pass clearly.
The Calibration Circuits
Your laser distance meter needs occasional calibration to maintain accuracy. Built-in calibration circuits help with this.
Calibration circuitry compensates for:
Some devices have user-accessible calibration. Others require professional calibration. The calibration circuits ensure your measurements stay accurate throughout the device’s life.
Memory Storage
Modern laser distance meters include memory storage. This lets you store measurement data for later review. Some devices can store hundreds of measurements.
The memory storage chip sits on your PCB board. It communicates with your MCB to save and retrieve data. Advanced devices organize measurements by project or date.
Optional Bluetooth Module
Premium models include a Bluetooth module. This wireless component connects your laser distance meter to smartphones or tablets.
The Bluetooth module lets you:
The Bluetooth module requires its own power and wireless antenna. It adds complexity but delivers real convenience for professionals.
How All the Components Work Together
Now let’s see how parts of a laser distance measurer work as one unified measurement system.
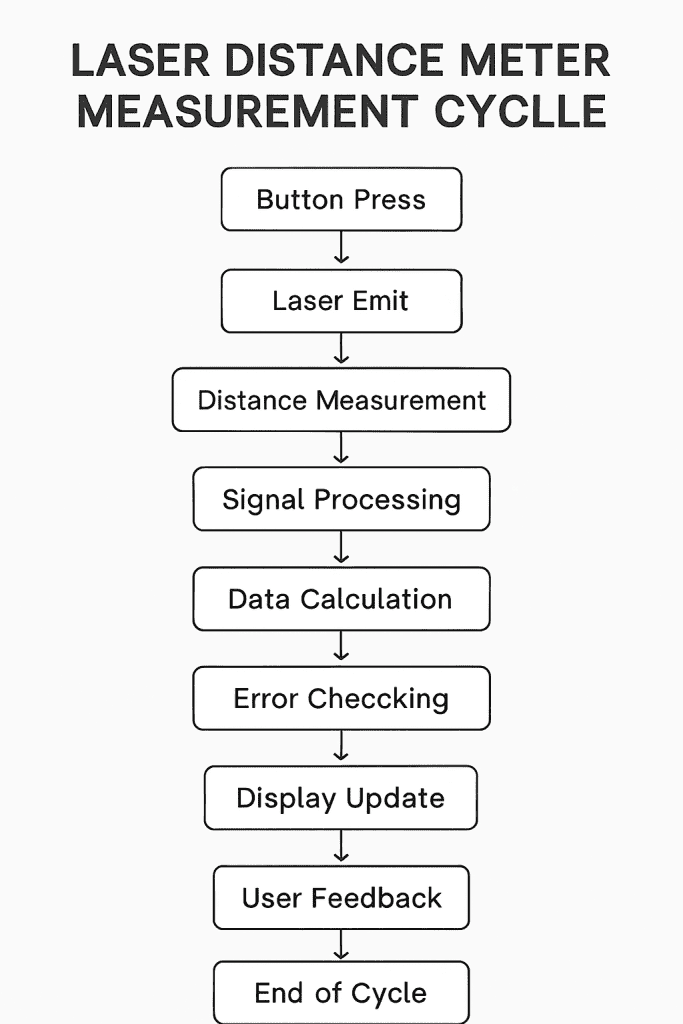
Here’s what happens when you press the button:
Step 1: Activation Your finger presses the control buttons. The MCB receives this command and springs into action.
Step 2: Laser Firing The MCB sends a signal to your infrared laser diode. The laser emitter fires a powerful but brief pulse. Timing circuits mark the exact moment of firing.
Step 3: Outbound Journey Your laser beam travels through the optical path. The beam splitter directs it outward. The optical sensor’s transmitting lens collimates the light into a focused beam.
Step 4: Target Impact The laser hits your target surface and bounces back. The beam doesn’t return perfectly—it scatters somewhat. The quality of your target surface affects the reflection.
Step 5: Return Journey Reflected light travels back toward your device. Most of this light scatters in all directions. Only a tiny fraction returns to your device’s receiving lens.
Step 6: Signal Detection Your receiving lens focuses the faint returning light onto your photodiode receiver. The photodiode converts light into an electrical pulse.
Step 7: Signal Processing Your signal processor amplifies the weak signal. Electronic filtering removes noise. The result is a clean electrical pulse matching the returned light.
Step 8: Time Measurement The timing circuit measures how long from initial firing to signal return. This elapsed time is incredibly brief—usually nanoseconds.
Step 9: Calculation Your MCB receives the timing data. It performs instant calculations using the speed of light formula. Distance = (Speed of Light × Elapsed Time) ÷ 2
Step 10: Display The calculated distance appears instantly on your digital display unit. The MCB handles any temperature compensation or calibration adjustments. User interface shows the result in your preferred units (feet, meters, or inches).
The entire process happens in less than half a second. Your device might actually perform this cycle multiple times to verify accuracy. The measurement algorithms in your MCB average multiple readings for reliability.
Factors That Affect How Your Components Perform
The components of a laser distance meter work in harmony, but several factors influence their performance.
Environmental Conditions
Temperature affects electronic components. Cold weather slows chemical reactions in your battery. Heat causes electronic drift. Most devices work best between 32°F and 122°F (0°C to 50°C).
Humidity matters too. Moisture can corrode connections inside your device. This is why the protective housing’s dust-water resistant casing with IP rating matters on humid job sites.
Bright sunlight challenges your components. Strong ambient infrared light interferes with your photodiode receiver. Better optical filtering helps, but direct sun still reduces effective range.
Target Surface Characteristics
Your target’s surface greatly affects component performance. Dark surfaces reflect less light. Light-colored surfaces reflect more. Textured surfaces scatter light more than smooth surfaces.
Your laser measuring device’s components handle most surfaces well. But shiny reflective surfaces (like mirrors) can confuse your measurement system. Very dark surfaces (like black rubber) might reduce range slightly.
Measurement Distance
Your components perform differently at different distances. Close measurements (under 10 feet) are easiest. Your photodiode receiver gets strong signals. Error margins are tiny in absolute terms.
Long-distance measurements stress your components more. The returning signal is much fainter. Your optical sensor must perform optimally. Even tiny reflections from distant objects help.
Most handheld laser distance meters work well from 2 feet to 300 feet. Industrial instruments extend these ranges significantly.
Operator Technique
Even the best components work poorly with poor technique. Shaky hands cause measurement errors. Pointing at edges or corners instead of flat surfaces causes problems. Measurement angle matters too.
Professionals train to hold devices steady. They aim carefully at the right target. They understand their device’s limitations. Good technique maximizes what your components can achieve.
Component Specifications Across Different Device Types
Not all laser distance meters contain identical components. Entry-level devices have simpler components. Professional models include advanced parts.
Entry-Level Models (40-60 meter range):
Professional Models (100-200 meter range):
Industrial Instruments (300+ meter range):
The components of a laser distance meter scale up with price and capability. Better components deliver better accuracy and longer range.
Maintaining Your Laser Distance Meter’s Components
Your laser measuring device’s components need care to stay in peak condition.
Optical Component Care
Keep your optical sensor windows clean. Use soft cloths and approved lens cleaning solution. Avoid scratching the glass. Dust and dirt reduce the light transmission to your photodiode receiver. Regular cleaning maintains performance.
Never touch optical surfaces with bare fingers. Skin oils cause haze. This haze reduces signal strength and measurement accuracy.
Battery Care
Replace batteries before they’re completely dead. Old batteries can leak and corrode internal components. Rechargeable lithium batteries should be charged monthly even if not used. This prevents deep discharge damage.
Store your device in moderate temperature conditions. Extreme heat or cold damages the power management system and battery.
Overall Storage
Store your laser measuring device in a protective case when not in use. This protects against dust, moisture, and physical damage. Keep it away from extreme temperatures.
Periodic checks maintain long-term reliability. Every few months, test accuracy against a known distance. If results seem off, professional recalibration might be needed.
Common Problems and Component Solutions
Even well-maintained devices sometimes have issues. Let’s troubleshoot using component knowledge.
Problem: Device won’t turn on
Problem: No laser beam visible
Problem: Measurements seem inaccurate
Problem: Digital display unit shows nothing
Problem: Measurements jump around (unstable)
Problem: Very short measurement range
Most issues resolve with basic maintenance. Professional repair is rarely needed unless components suffer physical damage.
Advanced Components in Professional Models
Premium laser measuring devices include sophisticated additions.
Tilt and Angle Measurement
Professional models include tilt sensors—environmental sensors that measure vertical and horizontal angles. These sensors communicate with your MCB to calculate heights and horizontal distances indirectly. This feature requires additional circuitry and processing.
Advanced Data Management
Professional models feature extensive memory storage. They organize measurements by project, date, and type. Some sync automatically to the cloud.
Temperature Compensation
All devices compensate for temperature, but professional models do it more aggressively. Advanced calibration circuits continuously monitor internal temperature. The measurement algorithms adjust calculations automatically.
Laser Classification Upgrades
Some professional models use higher laser classifications. This allows more powerful laser emitters and greater measurement range. But all consumer devices stay within eye-safety limits.
The Future of Laser Distance Meter Technology
The components of a laser distance meter keep advancing. Let’s peek at what’s coming.
Miniaturization
Components keep getting smaller and more efficient. Future devices will be even more compact while maintaining range and accuracy.
AI-Enhanced Accuracy
Machine learning algorithms will learn from measurement patterns. Your device will predict and correct for environmental factors automatically.
Enhanced Connectivity
Bluetooth will evolve to faster, more reliable standards. Future laser measuring devices might integrate with AR (augmented reality) systems. You’ll see measurements overlaid on your phone’s camera view.
Extended Battery Life
New battery chemistries will power devices for 100,000+ measurements. Some future models might use solar charging.
Sensor Fusion
Multiple measurement technologies combined will give you optimal accuracy. Your device will automatically select the best method for each situation.
Smartphone Integration
Future devices might attach directly to smartphones. The phone provides display, processing power, and connectivity. Your laser emitter becomes a compact attachment.
Frequently Asked Questions
Q: What’s the most important component inside a laser distance meter?
A: All components matter, but the infrared laser diode and photodiode receiver form the foundation. Without a good laser emitter and receiver pair, nothing else matters. These two components determine your maximum measurement range and accuracy potential.
Q: How long do laser distance meter components actually last?
A: Most components last 5-10 years with normal use. Batteries need replacement annually. Photodiode receivers slowly degrade but usually outlast the battery. Infrared laser diodes can last 10-20 years if not overdriven. The physical protective housing can last indefinitely if cared for.
Q: Can I replace individual components myself?
A: Most consumer models have non-replaceable internal components. Professional repair shops can replace batteries and sometimes optical windows. Trying to disassemble your device usually voids the warranty and risks damaging it. Manufacturer service is your best option for component replacement.
Q: What causes laser distance meter components to fail?
A: Physical drops damage internal circuits and optics. Water damage (despite protective housing) causes corrosion. Extreme temperatures degrade batteries and electronics. Lens contamination reduces measurement capability. Normal aging affects photodiode receivers over years of use.
Q: How do I know if my device needs recalibration?
A: Test against a known distance (like your home’s front wall). If your measurement is off by more than 1/8 inch per 100 feet, recalibration is needed. Most manufacturers recommend professional calibration every 1-2 years for frequent users. Environmental sensors like temperature compensators help maintain accuracy between calibrations.
Q: Do expensive laser distance meters have better components?
A: Absolutely. Premium models feature higher-quality infrared laser diodes with greater power output. Their photodiode receivers are more sensitive. Optical components use premium glass. Display units are larger and brighter. Processing circuits are faster and more sophisticated. You pay for measurably superior components.
Q: What wavelength laser is safest in laser measuring devices?
A: Class II infrared lasers (905nm) used in most handheld devices are extremely safe. The eye’s protective reflex (blinking) activates before injury occurs. 1550nm wavelengths are even safer because eyes absorb this infrared wavelength in the cornea rather than focusing it on the retina. All consumer devices meet strict safety standards.
Q: Can weather really affect my measurements?
A: Yes. Extreme cold slows internal components and reduces battery power. Extreme heat causes electronic drift and inaccuracy. High humidity doesn’t directly affect measurements but can corrode components over time. Dust blocks your optical sensor windows. Rain (for non-waterproof models) damages electronics. Keep your device within its operating temperature range for best results.
Conclusion
The components of a laser distance meter represent some of the smartest engineering compressed into one handheld device. Each part plays a vital role. Together, they perform sophisticated measurements instantly and accurately.
Your infrared laser diode sends precise pulses of light. Your photodiode receiver captures impossibly faint reflections. Your MCB performs instant calculations using the speed of light. Your digital display unit shows results you can trust.
Understanding how these internal components work helps you use your device better. You’ll get more accurate measurements. You’ll know how to care for your instrument. You’ll appreciate the remarkable technology you hold in your hand.
Whether you’re a construction pro who uses a laser measuring device daily or an engineering student studying measurement technology, this deep dive into laser distance meter components should illuminate how these devices work.
The next time you use your laser distance meter, remember all that happening in milliseconds inside. Appreciate the optical sensor, the laser emitter, the photodiode receiver, and all the supporting components working in perfect harmony.
That’s the true magic of modern measurement technology.
Want to learn more? Check out our guides on laser distance meter accuracy, choosing the right device for your needs, and professional calibration services. Understanding components of a laser distance meter is just the beginning of mastering this essential tool.