Want to know how a multimeter works? This tool is one of the best things you can own. Whether you fix things at home or study electricity, a multimeter helps you test circuits safely.
Let me explain what this device does. A multimeter combines three tools into one. It measures voltage, current, and resistance. You can test if a battery works. You can find broken wires. You can check if power reaches an outlet.
This guide will show you how multimeters work. You’ll learn both analog and digital types. You’ll see real examples. Best of all, you’ll understand why this tool matters for your projects.
What Is a Multimeter?
A multimeter is an electrical testing tool. It lets you measure three key things: voltage, current, and resistance.
Think of it like a Swiss Army knife for electronics. Instead of carrying three separate meters, you get one device that does it all.
The word “multimeter” comes from “multi” (many) and “meter” (measure). So it measures many things.
Here are the three core jobs:
You’ll use these measurements for many tasks. Testing batteries. Finding broken connections. Checking if outlets work. Diagnosing why devices fail.
Most people don’t realize how useful this tool is. You can fix household items. You can debug electronic projects. You can stay safe by checking voltage before touching wires.
The Two Types: Analog vs Digital
Your multimeter is either analog or digital. Let me explain the difference.
Analog Multimeter
An analog multimeter has a needle. The needle moves across a scale. The further it moves, the higher the measurement.
These meters have been around for decades. They’re simple. They’re affordable. You can see real-time changes as they happen.
The downside? You have to read the scale yourself. It’s easy to misread. You might pick the wrong scale, too.
Digital Multimeter
A digital multimeter shows numbers on a screen. The screen displays exactly what you’re measuring. No guessing. No misreading scales.
These are more modern. They’re more accurate. They often have extra features. They cost a bit more but are worth it for beginners.
Most people today use digital multimeters. They’re easier and more precise. Unless you need to see quick changes, digital is the better choice.
How Analog Multimeters Work
Let me explain how an analog multimeter works. This uses something called a galvanometer.
A galvanometer is a sensor that detects electric current. Inside the meter, there’s a coil of wire. This coil sits in a magnetic field.
Here’s what happens step by step:
Step 1: Current enters the coil
When you test something, current flows into the meter’s coil.
Step 2: Magnetism pushes the coil
The current creates a magnetic field. This field interacts with the meter’s permanent magnets. The magnets push the coil.
Step 3: The needle moves
The coil is attached to a needle. As the coil moves, the needle moves across the scale.
Step 4: The scale shows the result
The needle points to a number. That number is your measurement.
It sounds complex, but it’s clever. Small currents make the needle move a little. Large currents make it move a lot. The movement is proportional to what you’re measuring.
This design has been used for over a hundred years. It still works great today.
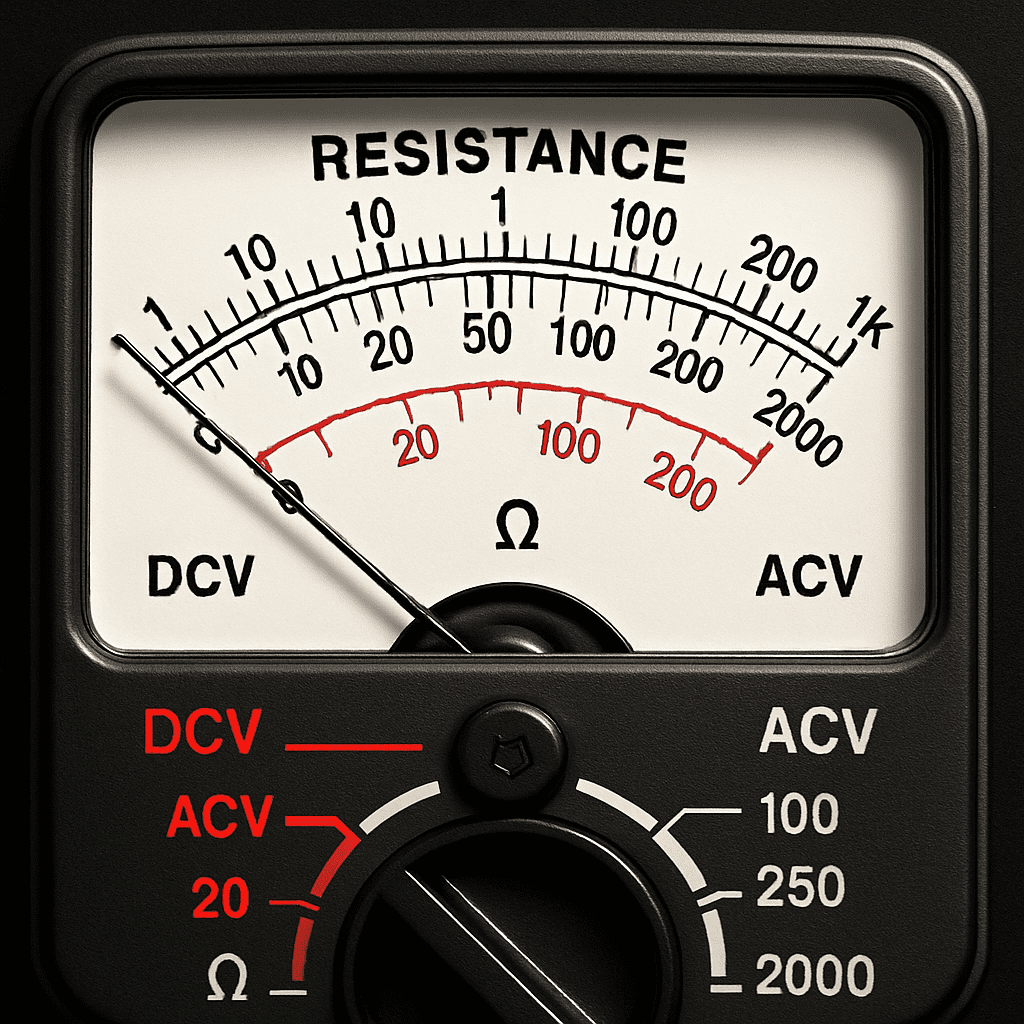
Analog Multimeter with Scale
How Digital Multimeters Work
A digital multimeter uses completely different technology. No moving parts. No needle. Just electronics and math.
Here’s the process:
Step 1: Your probes pick up a signal
You connect the two test probes to what you’re measuring. The probes collect an electrical signal.
Step 2: The circuit processes the signal
Inside the meter, special circuits prepare the signal. They clean it up. They make it ready to measure.
Step 3: A converter changes the signal
An analog-to-digital converter transforms the electrical signal into numbers. Think of it like translating electricity into a language the meter understands.
Step 4: The processor does the math
A small computer inside the meter uses these numbers. It performs calculations using the rules of electricity.
Step 5: The screen shows the result
The final number appears on the LCD screen. You read it directly. No scale. No guessing.
This process happens in a fraction of a second. Modern digital multimeters are extremely fast and accurate.
The Three Main Measurements Explained
Your multimeter can measure three core things. Let me break each one down.
Voltage Measurement
Voltage is electrical pressure. Think of it like water pressure in a hose. Higher voltage means more electrical push.
When you measure voltage, you connect the probes on both sides of what you’re testing. The probes don’t interrupt the current. They just observe it.
For example: Test a battery. Connect the red probe to positive (+). Connect the black probe to negative (-). A good AA battery shows about 1.5 volts.
Why does this matter? You need to know if a power source is working. If it shows zero volts, it’s dead.
Current Measurement
Current is the flow of electricity. Think of it like water flowing through a pipe. Current is measured in amps or milliamps.
To measure current, you must put the meter in the circuit path. The current must flow through the meter. This is different from voltage measurement.
Here’s an important warning: Never measure current the wrong way. It can destroy your meter instantly.
Current tells you how much power something is using. Heavy-draw devices use lots of current. Low-power devices use just a little.
Resistance Measurement
Resistance is how much something blocks current. Think of it like friction slowing down water.
To measure resistance, the meter sends a tiny voltage through something. Then it sees what comes back. This tells it the resistance value. Resistance is measured in ohms.
Here’s a key point: You must disconnect power before measuring resistance. Measure on powered circuits and your meter dies.
Resistance helps you test components. A broken wire shows high resistance. A good wire shows almost zero resistance.
How to Actually Use a Multimeter
Let me give you real examples. Here’s how to measure each type.
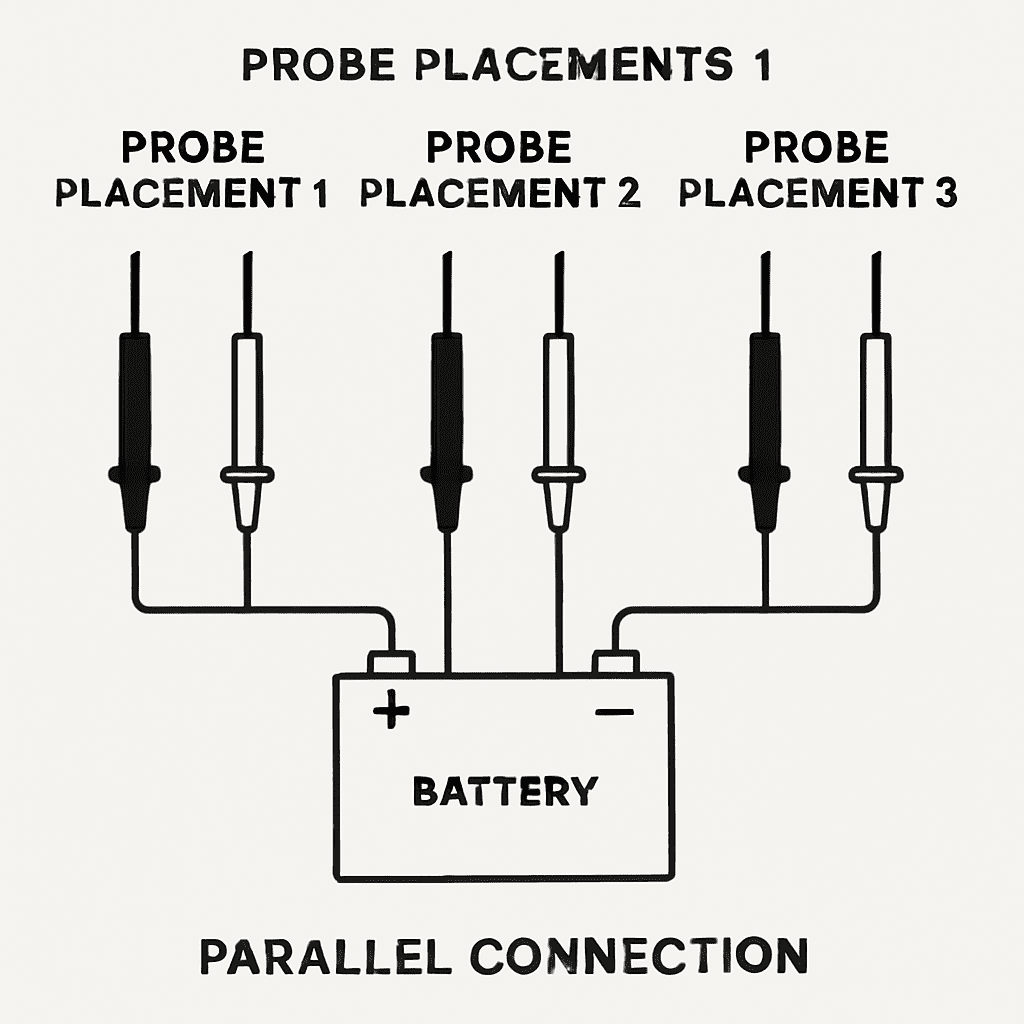
Probe Connection Diagram
Testing Voltage (Most Common)
- Set the dial to V for voltage
- Choose AC or DC (DC for batteries, AC for outlets)
- Plug the black probe into the COM hole
- Plug the red probe into the V hole
- Connect red probe to the positive side
- Connect black probe to the negative side
- Read the number on the screen
That’s it! You just tested voltage.
Testing Current (More Advanced)
- Set the dial to A for amps
- Choose AC or DC based on your circuit
- Plug the black probe into the COM hole
- Plug the red probe into the A hole (NOT the V hole—this is critical)
- Turn off power first
- Break the circuit path and insert the meter
- Turn power back on
- Read the current
Be careful here. Wrong connections destroy meters instantly.
Testing Resistance (For Components)
- Set the dial to Ω for ohms
- Plug probes into COM and V holes
- Turn off all power to the circuit
- Disconnect the component you’re testing
- Touch probes to both sides of the component
- Read the resistance value
This is the safest measurement. Still, always power off first.
Common Things People Get Wrong
Let me share mistakes I see all the time. These errors damage meters or give bad results.
Mistake 1: Measuring Voltage Like Current
Some people connect the probes in series when measuring voltage. This creates a short circuit. The meter either breaks or gives no reading.
Fix: Always measure voltage with probes on both sides (parallel). Never interrupt the circuit path.
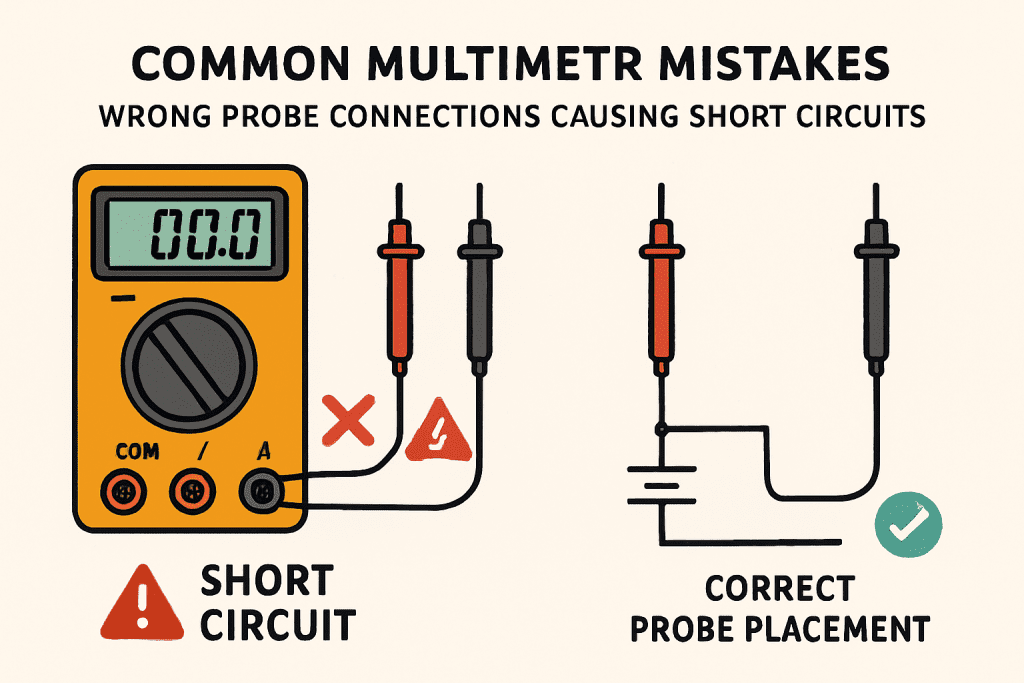
Common Mistakes Reference
Mistake 2: Measuring Current Like Voltage
Some put probes across a circuit when measuring amps. This shorts out the circuit. Your meter’s fuse blows instantly.
Fix: Current must flow through the meter. You interrupt the circuit path, then insert the meter.
Mistake 3: Testing Resistance on Powered Circuits
Testing resistance while power is on destroys the meter’s battery. The meter gives false readings, too.
Fix: Always turn off power before testing resistance. Always disconnect the component being tested.
Mistake 4: Wrong Probe Jacks
Your meter has different holes for different measurements. Some people leave the red probe in the wrong hole.
Fix: Voltage and resistance use the same hole. Current uses a different hole. Check the label on your meter.
Mistake 5: Misreading the Analog Scale
Some analog meters have multiple scales. You can pick the wrong one and get a completely wrong answer.
Fix: Look at what the dial is set to. Find that scale on the meter face. Read the needle’s position on that scale.
When You Actually Need a Multimeter
Let me give you real situations. These show why multimeters matter.
Scenario 1: Dead Remote Control
Your TV remote stops working. Is it the batteries or the remote?
Use a multimeter to test the battery voltage. A good AA battery reads about 1.5V. If it reads 0V, the battery is dead. If it reads 1.5V and the remote still doesn’t work, the remote might be broken.
Scenario 2: Outlet Doesn’t Work
A bedroom outlet won’t power anything. Is it the outlet or the device?
Use a multimeter to test the outlet voltage. Good outlets in the US show 120V AC. If your outlet shows 0V, it’s broken and needs fixing. If it shows 120V, your device is the problem.
Scenario 3: Finding a Broken Wire
An extension cord stops working. You don’t know where it’s broken.
Use continuity mode on your multimeter. This sends a tiny current through the cord. If the meter beeps, the cord is good. If it doesn’t beep, the cord is broken at that point.
Scenario 4: Car Battery Problems
Your car won’t start. The battery might be weak or the alternator might not be charging.
Test the battery voltage when the car is off. A good 12V battery reads about 12.6V. When the engine runs, it should read about 13.8-14.5V. Lower readings mean problems.
Scenario 5: Household Circuit Breakers Trip
Lights flicker in your bedroom. Something’s wrong with the circuit.
Use a multimeter to test outlets and switches. You’re looking for loose connections causing resistance. Higher-than-normal resistance readings mean corrosion or loose wires.
The Most Important Safety Tips
Before you use any multimeter, know these safety rules.
Rule 1: Never touch the metal probe tips
Always hold probes by the plastic handles. The tips are conductive. You could shock yourself.
Rule 2: Start with the highest voltage range
If you don’t know the voltage, start high. You can always go lower. Starting too low damages the meter.
Rule 3: Never measure resistance on powered circuits
This destroys the meter’s internal battery. Your readings become useless too.
Rule 4: Respect high voltages
Anything over 50V can be dangerous. Household outlets are 120V or 240V. Treat them with extreme caution. Use proper safety equipment.
Rule 5: Never leave probes touching while you’re not watching
You might accidentally short something. Leave the meter unattended and disaster happens.
Rule 6: Always check your connections
Verify where each probe goes before powering on. A moment of checking prevents hours of regret.
Questions People Ask
What does CAT rating mean?
CAT ratings show how safely a meter handles fault conditions. CAT III is for household use. CAT IV is for industrial settings. Higher ratings mean more protection.
Can I use any multimeter for any job?
No. Basic digital multimeters measure voltage, current, and resistance. Advanced models add capacitance, frequency, and temperature. Choose one that fits your needs.
How accurate are multimeters?
Basic models are accurate to within 1-3%. Professional models reach 0.1% accuracy. For home use, standard accuracy is fine.
What’s the best multimeter for beginners?
Get a basic digital multimeter. Look for auto-ranging (picks the range for you). Make sure it has good reviews. Spend $15-30 for a quality beginner model.
Can a broken multimeter be repaired?
Sometimes. Usually, you just need a new battery or a blown fuse. Bad probes are cheap to replace. Internal damage usually means replacement time.
Why would I choose analog over digital?
Analog meters show smooth, continuous movement. This helps you see quick changes in real-time. They don’t need batteries. For troubleshooting certain electronics, some people prefer analog. But digital is best for beginners.
Why This Tool Matters
A multimeter is your window into electrical systems. You can see what’s working and what’s broken.
For DIY enthusiasts, it saves money. You find the real problem instead of guessing. No more replacing expensive parts that weren’t broken.
For students, it’s educational. You learn how electricity actually works. Theory becomes real.
For anyone who owns a home, it’s safety. You verify power is off before touching wires. You find dangerous loose connections. You prevent electrical fires.
The multimeter is simple. But it’s powerful. It turns mystery into knowledge. It turns problems into solutions.
Final Thoughts
Now you understand how multimeters work. Both analog and digital types make sense. You know when to use voltage, current, and resistance measurements.
More importantly, you know the common mistakes. You can use this tool safely and correctly.
Start simple. Test a battery. Try measuring household outlet voltage. Get comfortable holding the probes. Build your confidence.
Once you’re ready, tackle harder projects. Test circuits. Check components. Diagnose electrical problems.
The multimeter will become your trusted helper. It’s one of the best investments you can make for DIY work or electrical learning. Every electrician has one. Every engineer uses one. Every hobbyist benefits from one.
You’ve got this.